PPC blog images (300 × 300px) (6)

Best Practices To Improve Your PPC Landing Page

Best Practices To Improve Your PPC Landing Page


As a PPC expert, you will understand the critical role that landing pages play in the success of our campaigns. A well-optimised landing page can significantly improve conversion rates, enhance user experience, and improve your ad rank. In this blog post, we will go through some of the best practices to help you improve your PPC landing pages and boost the effectiveness of your campaigns.


⚡Trust Signals and Social Proof

Building trust and credibility on your landing pages may be what encourages a customer to complete a conversion action. This provides strong trust signals to the site and should be visible to increase user confidence. To do this, consider including customer testimonials, client logos, security badges and any relevant awards or certifications that your business/staff have acquired. Trustpilot is one of the most well-known review sites that users recognise as this is a transparent third-party site where previous customers can report back on their experience. Put emphasis on receiving reviews from customers to build up your score and then display them in a widget or banner on your website.


⚡Align Landing Pages With Ad Copy

Making sure there is a seamless transition between your ad copy and landing page content is important. Maintaining consistent messaging, keywords, and design elements will reassure the user that they’ve arrived in the right place. By delivering a consistent experience, you can reduce bounce rates and improve the chances of conversion. 


⚡Clear and Compelling Headline

Make sure you create a clear and attention-grabbing headline that instantly communicates the value proposition of your product or service. Make it relevant, concise, and interesting to the ad that brought the user to the landing page. Most people don’t read every word on the page, they skim through it – a strong headline captures attention, engages the user and encourages them to stay on the page and engage further.


⚡Optimise for a fast loading speed

Page load time is crucial for both user experience and ad quality scores. Optimise your landing pages to load quickly by compressing images, minifying code, and leveraging browser caching. Fast load times can enhance user experience, and also positively impact ad performance. According to Google, two seconds is the acceptable threshold for loading times on an e-commerce website.


⚡Concise and Engaging Content

Create concise and persuasive content that clearly communicates the benefits of your product or service. Use bullet points, subheadings, and visual elements such as icons and logos to break up the text and make it more digestible for the user. Focus on the unique selling points and address any pain points customers may have. Remember when the user has clicked on your ad they already have a higher intent to convert. Optimise all content on this page to make sure that it all directly contributes to a conversion.


⚡Strong Call-To-Actions

Include a clear CTA that guides users to complete the action. There is no point in paying to bring a user to the site if we aren’t going to give them a clear path to conversion. Use action-orientated words such as ‘Shop Now’, ‘Start Your Claim’ and, ‘Sign Up Today’ to create a sense of urgency and encourage the customers to make prompt action. Make the CTA visually stand out so that it cannot be missed. Some ways to do this are using encapsulation and bold colours. If you have more than one CTA, prioritise them to have the most desired first.


⚡Mobile-Friendly Focus

It is crucial to optimise your landing pages for mobile devices. Ensure that the design is suitable, and provides easy navigation for the user. What works on desktop may not on mobile. Text-heavy landing pages can mean that the user has to scroll many times before reaching a CTA. Make sure you test your landing pages across different devices and screen sizes for a seamless user experience. 


Some things to consider when optimising for mobile:

👉CTAs are centred or aligned to the right – design with thumb in mind.

👉Keep clickable elements large and spaced out – many people use their phones with one thumb or finger.

👉Design for less space – prioritise your landing page elements.

👉Make each word count – you have less space for text on the page so cut out any fluff and prioritise.

👉Make speed your top priority – users are especially picky about page speed on mobile.


⚡A/B Testing

Make sure you’re continuously testing and optimising your landing pages to improve their performance. Conduct A/B tests to compare different versions of your landing page elements, such as headlines, CTAs, layout, and images. Collect data and analyse your results, and make data-driven decisions to refine and enhance your landing pages.


⚡Conversion Tracking

Lastly, ensure your conversion tracking is working and accurate to measure the effectiveness of your landing pages. Set up conversion events and track key metrics such as conversion rate, bounce rate, time spent on a page, and average session duration. You can then leverage this data to identify areas for improvement and make informed decisions to benefit your PPC campaigns.


Conclusion:

To round this up, optimising your landing pages is a vital part of running successful Google Ads campaigns. By following these best practices, you can create landing pages that engage users, deliver a seamless user experience, and drive conversions. Continuously test, analyse, and refine your landing pages to achieve the best results for your client. Remember, a well-optimised landing page is a key ingredient in maximising the return on investment of your PPC efforts.

1689234443651

Cedarwood Win Two UK Digital PR Awards!

We’re delighted to win not one, but two awards at the UK Digital PR Awards yesterday!

We took home:

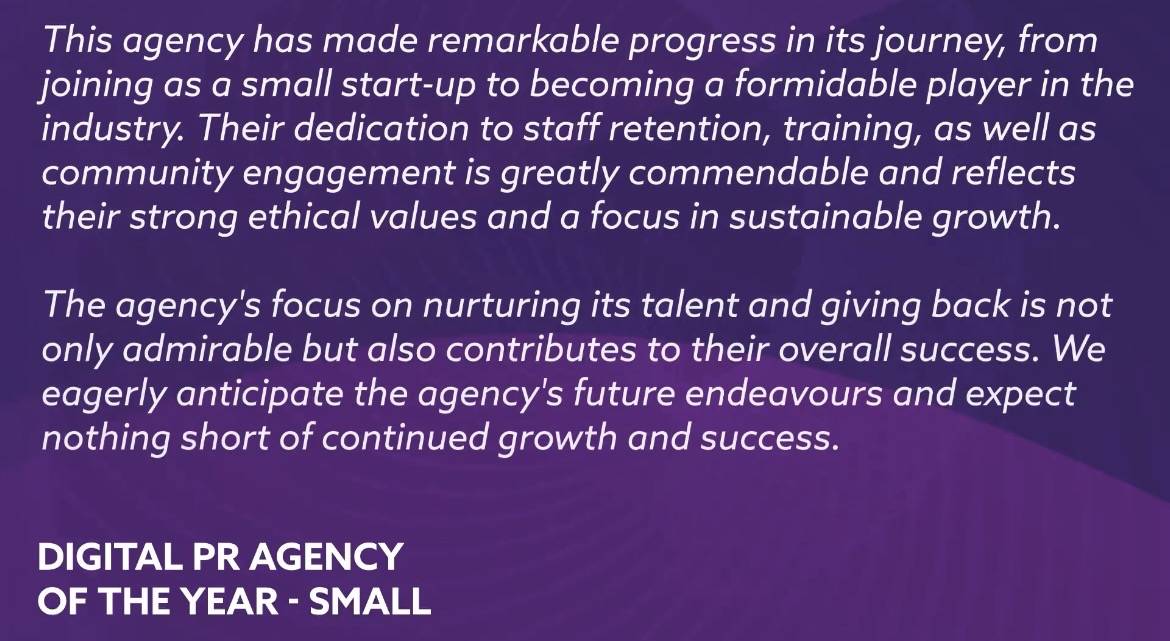
🏆Digital PR Agency Of The Year

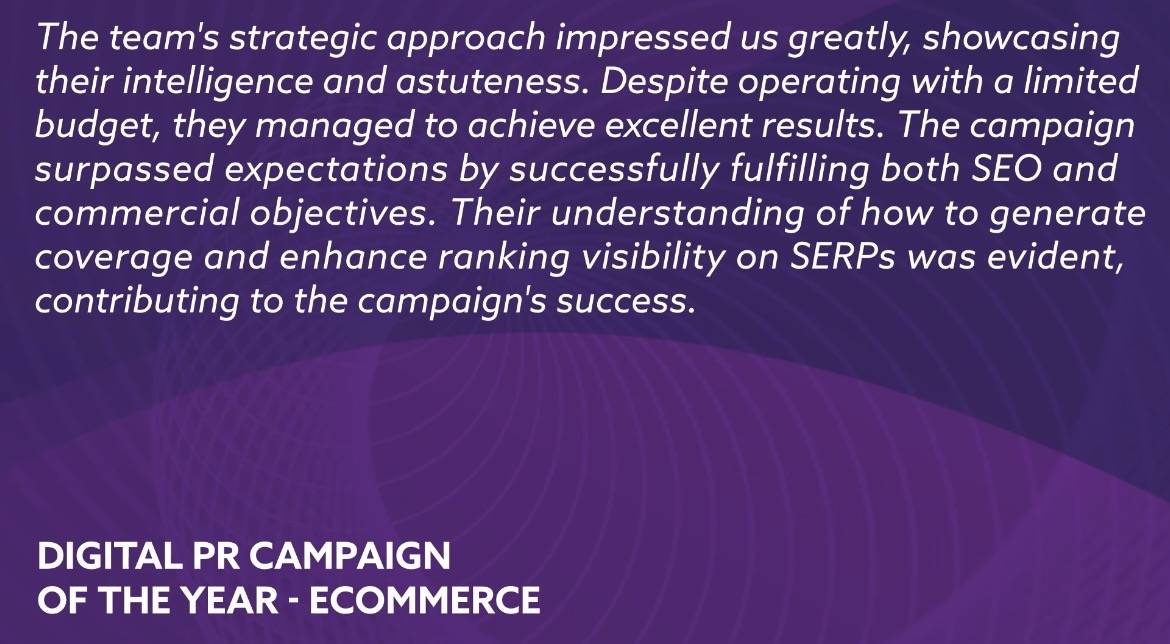
🏆Digital PR Campaign Of The Year – E-commerce


Here’s what the judges had to say:

MicrosoftTeams-image (16)
MicrosoftTeams-image (15)

Digital PR has been a huge area of success for Cedarwood over the last 12 months, so we’re over the moon that this is now being recognised in such a competitive space🎉.

A big congrats to the team, for all their hard work! 👏

PPC blog images (300 × 300px) (1)

Google Merchant Center: Optimising your products for position #1

Google Merchant Center: Optimising your products for position #1

If you have e-commerce clients, you’ll understand the importance of achieving maximum visibility for their products. Google Merchant Center plays a crucial role in driving conversions by allowing businesses to showcase their products through Google Shopping ads at the top of a Google Search page.

In this blog post, we will explore the significance of Google Merchant Center and share best practices to optimise your product listings to achieve the most desirable first position.

Understanding Google Merchant Center:

Google Merchant Center is a platform that allows businesses to upload their product data and make it available to potential customers through Google’s shopping channels, including Search, Shopping, and Images. The goal of this is to enhance the visibility of their offerings by showcasing elements like images, prices, special offers and compare these with other advertisers within the auctions. This allows for competitive advantages and therefore helps to attract customers to the business.

The Importance Of First Page Positions:

With paid shopping listings, it’s important to secure positions at the start of the shopping listing carousel as it makes products visible with no other interaction on the page. Achieving positions close to the front of the listing carousel provides significant advantages, including higher visibility, increased CTR, and a higher chance of conversions. In order to do this a strategic approach is needed alongside careful optimisation of your product data.

Key areas to focus on:

  1. Feed Optimisation:
    ⚡Ensure accurate product data: Provide precise information such as title, description, pricing, and availability. Avoid vague or misleading details that might frustrate users.

⚡The general best practices for the order of product titles are brand + product type + attributes (such as colour, size, material).

⚡Utilise relevant keywords: Conduct thorough keyword research and incorporate them naturally into your titles and descriptions. Focus on long-tail keywords that align with user intent.

⚡High-quality images: Use high-resolution, visually appealing product images that showcase your offerings. Ensure that the photos aren’t misleading showing more products that could lead the user to think that both are part of the listing. Optimise them for size and load speed without compromising quality.

⚡Detailed product attributes: Provide as much relevant information as possible, including colour, size, material, brand, and any other attributes that could influence a user’s decision.

2. Competitive Pricing and Offers: To stand out from your competitors, regularly analyse market trends and adjust your pricing strategy accordingly. Offer competitive prices, discounts, promotions, or exclusive deals to incentivise potential customers to choose your products over others.

3. Product Reviews and Ratings: Encourage customers to leave reviews and ratings for your products. Positive reviews not only boost consumer confidence but also influence Google’s algorithms, potentially improving your chances of securing higher positions.

4. Ad Campaign Optimisation: Combine your product listing efforts with Google search campaigns to enhance your visibility further. Implement well-structured, targeted campaigns that align with your product listings and optimise ad copy, bids, and targeting to improve ad relevancy and increase your chances of securing the top position.

Conclusion:

Optimising your product listings in Google Merchant Center is crucial for achieving a high position and maximising your Pmax and shopping campaign success. By following the tips outlined in this blog post, you can improve your chances of appearing at the top of Google’s shopping platforms, increasing visibility, attracting new customers, and driving conversions. Continuously monitor and refine your efforts to stay ahead of the competition and ensure your clients’ products receive the attention they deserve!

PPC blog images (300 × 300px) (6)

A Guide To Meta Creatives

Meta ad creatives come in various forms and formats. From single images to videos, carousels, and collections, Meta offers a range of options for you to choose from to help businesses achieve their marketing objectives. But, with all these options it can sometimes get a little confusing on which ones are the right ones to pick. 

This blog is going to run through the different types of ad formats, their specifications and best practices for each one. 

Ad Formats

Image Ads

These are the most basic type of ads on Meta platforms and consist of a single image that is usually accompanied by text and a call to action (CTA) button. The image should be eye-catching and relevant to the ad’s message. Image ads are easy to create and are a great option if you have a limited budget.

Best Practices for Image Ads:

⚡Use high-quality images that are relevant to your ad’s message.

⚡Keep text to a minimum to avoid clutter.

⚡Use a clear CTA button that is in line with your campaign objective.

⚡Showcase your USPs to attract your audience.

Video Ads

Video ads have become increasingly popular in the last few months. They can be used to showcase a product or service, tell a story or entertain the audience. Video ads can be in-feed or story ads and can be a maximum of 60 seconds long. They are a great way to connect with the audience and build engagement. 

Best Practices for Video Ads:

⚡Grab the viewer’s attention within the first few seconds.

⚡Always use subtitles or captions to make your message clear, even when muted and for accessibility purposes.

⚡Tell a story or create an emotional connection with your audience.

⚡Include clear CTA buttons to encourage action from the viewer.

⚡Keep the video short and sweet (under 30 seconds is ideal).

Carousel Ads

Carousel ads consist of two or more images or videos that the user can swipe through. Each card has its own headline, description, call to action button and link to its landing page. You could use this feature to showcase different products, highlight multiple benefits, or you can create a story for the user to swipe through. 

Best Practices for Carousel Ads:

⚡Use high-quality images/videos that showcase your product or service.

⚡Create a story with your slides or highlight different products or features.

⚡Make sure you are sending users to the most relevant URL for each card.

⚡Select a clear CTA on the card that aligns with your campaign objective.

Collection Ads 

This format shows a collection of images that can be used to showcase multiple products. Users can click on a collection ad to view a fullscreen instant experience. This provides the user with a seamless instant experience without leaving the app. This is only available for Facebook feeds, Instagram feeds and Instagram stories.

Best Practices for Carousel Ads:

⚡Use high-quality images/videos that showcase your product or service.

⚡Create a story with your slides or highlight different products or features.

⚡Select a clear CTA on the card that aligns with your campaign objective and encourages users to click through to an instant experience.

Image and video specifications

Placement 

Ad Format 

Recommended Ratio 

Recommended Size (Px)

Recommended Length

File Type

Feed

Image 

1:1

1080×1080 


JPG or PNG

Video

1:1 or 9:16 

1080×1080 or above 

15-30 secs

MP4 or MOV

In-stream

Video

1:1 or 9:16 

1080×1080 or above  

15 secs to 10 mins

MP3 or MOV

Carousel

Image

1:1

1080×1080

2-10 cards

JPG or PNG

Stories 

Image 

9:16

1080×1920

or above


JPG or PNG

Video

9:16

1080×1920

5-15 secs

MP3 or MOV

Reels

Video

9:16

1080×1920

15-30 secs

MP3 or MOV

Right Column

Image

1.9:1

1200×628


JPG or PNG

Top takeaways

💥If you are unsure it is best to keep the size 1080×1080 pixels as this fits the most placements.

💥Keep ad copy short and to the point to make it easier for the audience to digest.

💥Include clear CTAs that align with your campaign objective.

💥Remember to highlight your USPs to attract your audience.

💥Trial different creatives to see what works best for you and your objectives.

PPC blog images (300 × 300px) (4)

Understanding Audiences In GA4

As an agency or business, understanding your audiences is crucial for driving meaningful results. By collecting and analysing insights into your website visitors, you can make informed decisions to optimise your digital marketing campaigns. With Universal Analytics sunsetting at the end of June, it is important for you to understand audiences within GA4 and how you can unlock powerful insights that can benefit you.


What are the audiences in GA4?

Audiences let you split your users into ways that are the most important for your business. They are made from groups of people that share common characteristics or behaviours that are based on data collected by GA4 from your website or app. These audiences can then be used for targeting and observation within Google Ads. 


What are the differences between Universal Analytics and GA4?

GA4 doesn’t collect the same data as Universal Analytics did. GA4 can now track users across different devices, domains, and apps. These audiences can create a more holistic view of your users’ behaviours and interests compared to previous Universal Analytics. It goes beyond traditional demographic targeting and uses machine learning to enable you to create more sophisticated and dynamic audience segments based on a wide range of user behaviours and attributes.


How do GA4 audiences work?

GA4 audiences are created based on events and parameters that you define within your GA4 property. Events are actions that users take on your website or app, such as page views, clicks, conversions, and others. Parameters are additional pieces of information associated with events, such as the user’s location, device type, or referral source. GA4 uses these events and parameters to build a profile of your users, allowing you to create highly targeted and personalised audience segments.


Creating Audiences in GA4

To create an audience:

➡️Navigate to “admin > audiences” to set up a new audience in GA4.

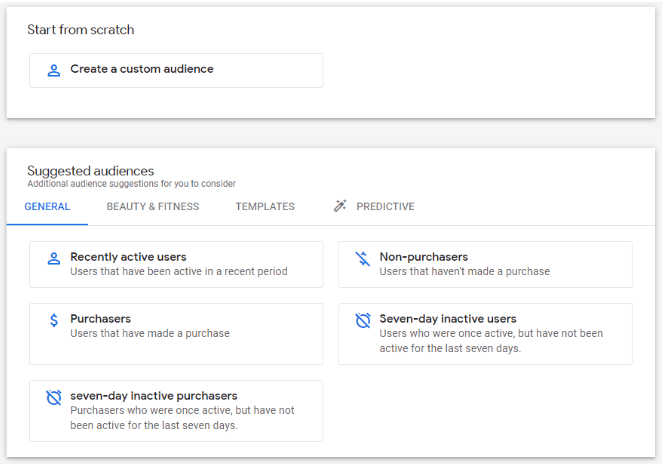
➡️You can go on to create an audience from GA4’s suggested audiences.

➡️Or start from scratch and create a custom audience using your own conditions.

Transferring audiences from Universal Analytics.

If you already have audiences set up within a Universal Analytics account you can easily transfer these over to GA4 using the GA4 Migrator for Google Analytics. However, not all Universal Analytics audiences are supported within GA4 so you may not be able to transfer them all.

This involves a few steps:

➡️Step 1: Install GA4 Migrator for Google Analytics.

https://workspace.google.com/u/0/marketplace/app/ga4_migrator_for_google_analytics/472716783070

➡️Step 2: Create a new blank Google Sheets (type sheets.new in the search bar for a shortcut).

➡️Step 3: Open ‘Extensions’ on the menu bar and GA4 Migrator for Google Analytics will appear. Hover over this and select the option to Migration audience definitions to GA4.

➡️Step 4: Follow the instructions to import audience definitions from your Universal Property and migrate to GA4 property.

Best Practices for GA4 audiences:

Now that you have a better understanding of GA4 audiences and how they work, you can use these to help optimise your campaigns. Here are some tips for best practices:

⚡Take advantage of the built-in audiences: Start with the built-in audiences that GA4 has to offer. These will automatically generate audience segments based on user behaviour. These include purchasers, non-purchasers, recently active users and more. This is a fast way you can gain insights into your user base and tailor your marketing messages accordingly.

⚡Define custom audiences: Creating custom audiences allows you to define audience segments that are specific to your business goals. You can create custom audiences based on a wide range of parameters, such as demographics, interests, behaviours, and more. Explore the different options available to you to create audiences that are more valuable for your business.

⚡Analyse and optimise your audiences: GA4 has powerful reporting capabilities that allow you to measure the performance of your audiences. You can track specific key metrics to determine the effectiveness of your audience segments. This will allow you to make data-driven decisions to refine your audience segments, achieve audiences that are no longer relevant to you, create new audiences, or adjust your strategy for better results.

⚡Ensure data privacy compliance: It is vital that you are collecting and using data in compliance with relevant data privacy laws and regulations, such as GDPR rules and regulations. Make sure to review and follow any updates to Google’s data usage policies and guidelines to ensure that you are using your audiences correctly. This includes obtaining user consent where necessary and providing transparency on data collection and usage.

To conclude, GA4 audiences are a powerful tool that can help you create highly targeted and personalised marketing campaigns. By leveraging the data collected from your website or app, you can create audience segments based on user behaviours, demographics and interests that will be valuable for your business. Audiences allow you to deliver relevant and tailored messages to our users that can be used within your Google Ads campaigns for better targeting and observation.

Winner!!

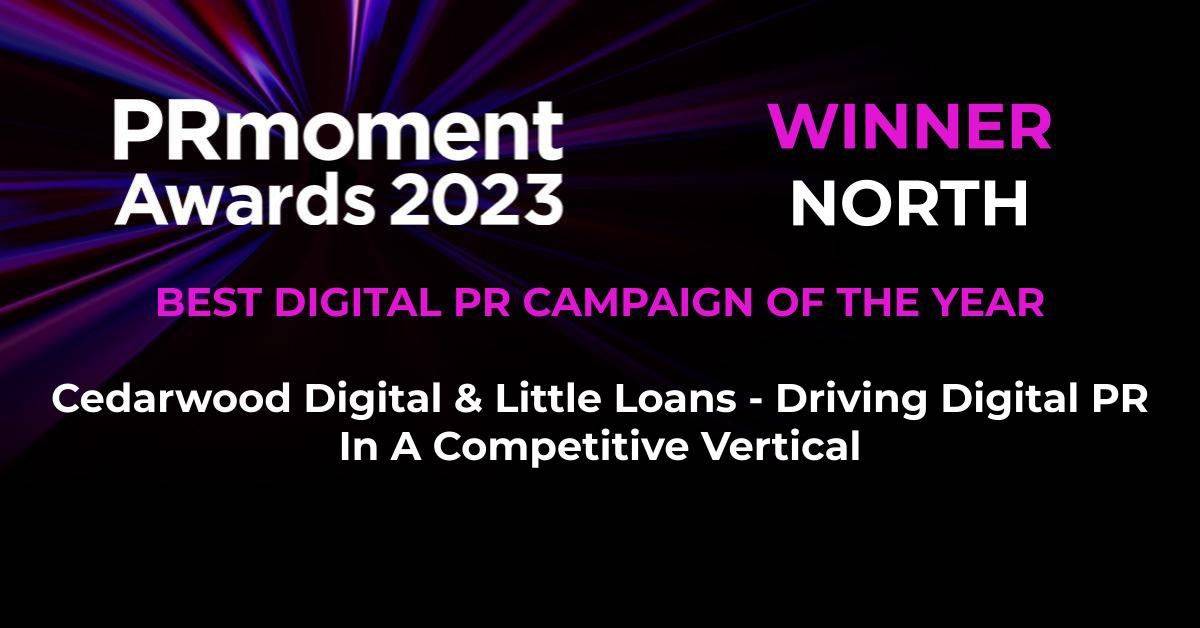
Cedarwood Wins Digital PR Campaign Of The Year 2023!

💥We’re Winners!💥

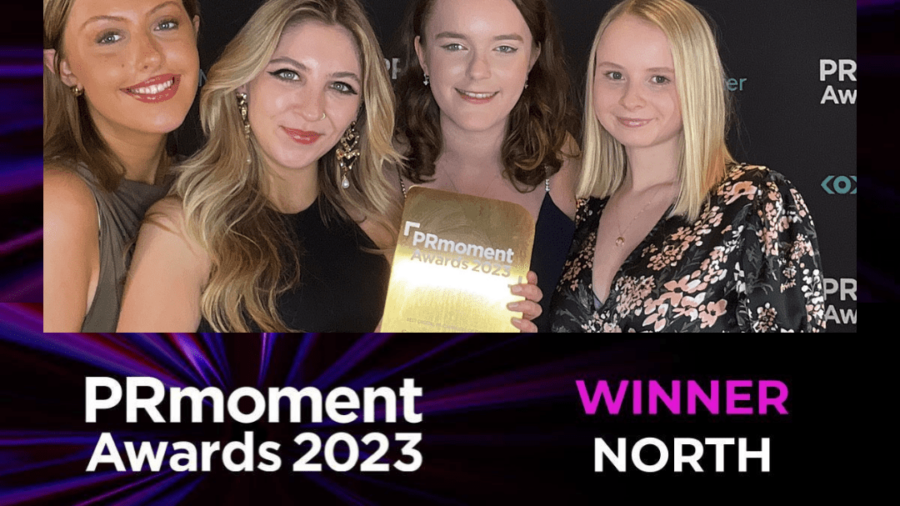
We are thrilled to announce that Cedarwood has won the Digital PR Campaign of the Year award at the PR Moment Awards 2023 for our outstanding work with Little Loans. Our team of digital PR experts, including Alex, Amber, Beth & Elle, put in tremendous effort to bring this campaign to life and we are proud to see their hard work being recognised.

PR moments - winner 2023

Digital PR has been a significant area of success for us at Cedarwood in the past 12 months. This award, in addition to our recognition at the UK Search Awards, we are delighted that we have also been recognised for this directly within the PR space.

The judges were impressed by our well-researched and well-thought-out campaign, which produced excellent results. Our team worked closely with Little Loans to create a unique campaign that not only raised their brand awareness but also increased their online visibility. 

Screenshot 2023-04-27 145355
PPC blog images (300 × 300px) (5)

Do’s And Don’ts For E-commerce On Facebook

The e-commerce landscape has experienced rapid changes in the past few years from the advancements in technology, changing consumer behaviours, and the impact of worldwide events such as the COVID-19 pandemic. This industry has been through its fair share of ups and downs. So where does that leave Facebook Ads and their effectiveness in driving e-commerce sales? 

We’ve put together 5 essential do’s and don’ts to keep in mind when creating your next sales campaign.


Do’s:

👍Do define your target audience. Take time to clearly define your target audience before creating your ads. Explore Facebook’s wide range of audience options including interests, detailed targeting, website data and lookalike audiences. The more clear your target audience is the more likely Facebook will target your ads at the right people that are the most likely to buy your products!

👍Do use compelling ad copy and high-quality creatives. Social media is highly visual and very competitive. Make sure your ad stands out from the crowd by making your ads eye-catching and creating emotion for the user. Ensure that you highlight the benefits that your products offer.

👍Do test! Experiment with different ad formats, such as carousel ads, video ads, and collection ads, to see what resonates best with your target audience. Along with this make sure you’re filling out all the different options for ad copy within the primary text, headline and description sections. Facebook allows you to add multiple text options that they will then show to each person, based on what they’re most likely to respond to.

👍Do set clear campaign objectives. Is your client looking to drive sales, generate leads, or increase traffic to their website? Make sure that this is clear to you before you start and select the aligning Facebook campaign objective for the best results.

👍Do optimise your ads for mobile users. With the majority of Facebook and Instagram users accessing on a mobile device, ensure that you optimise your ads for mobile. Look at your ad creative and copy to make sure it is mobile-friendly and eligible. If you’re creating ads on your desktop, make sure to test it on your mobile to make sure all creatives are eligible and not too small to read.


Don’ts:

👎Don’t overcomplicate your ad campaign. We usually use the 3×3 rule. 3 sets of the ad set with different targeting and 3 different ads. This allows us room to test what works best whilst still being easy to manage and optimise. If you have too many ads sets you can overload Facebook’s delivery systems which will negatively impact your performance.

👎Don’t narrow down your target audience too much. Broad targeting is on the rise on Facebook and we can agree that our best-performing campaigns are ones that have a broad target audience. This allows Facebook delivery systems to find the best people to show your ad to. This can lead to potential customers that you didn’t know about before. If you narrow down your target too much it limits Facebook’s capabilities, which will most likely lead to poor performance.

👎Don’t ignore your landing page experience. The majority of users are on a mobile device, therefore, make sure your landing page is mobile-friendly, and responsive. Having a slow loading speed can put users off and result in low conversion rates.

👎Don’t forget what the customer is looking for. It is important to think like your target audience to create the best ads for them. Is your product solving a problem for them? What makes it better than your competitors’ products? Have you got enough social proof online that you can use to your advantage? Think about why your customer would find value in your product and use this as clear USPs within your ads.

👎Don’t rely on one ad set or ad. Facebook works best when it can use its machine learning capabilities to test and see what performs best for your audience. Creating more ad sets and ads will allow for a better chance of success to hit the mark when it comes to your audience. You can optimise your ad sets later on, if you find that one ad set performs a lot better than the other then you can allocate more budget towards driving better results for your campaigns.


To round this up, Facebook ads can still be very effective in driving results for your business. Make sure you’re staying up to date with all the best practices, and testing to see what works best within your own ad account. You can start by focusing on these do’s and don’t to help increase your chance of achieving your campaign objective and start driving sales. Be responsive to the changes in consumer behaviour and market trends to ensure your product portrays value to your target audience. 

PPC blog images (300 × 300px) (1)

Meta Targeting 101

With Meta’s social media platforms being some of the largest in the world, it would be foolish not to advertise there. With over 2 billion users, Meta targeting options allow advertisers to hone in on specific demographics and interests, making it ideal to reach your desired audiences. In this blog post, we will take a closer look at the different targeting options available on Meta and how to use them effectively.

Audience Options

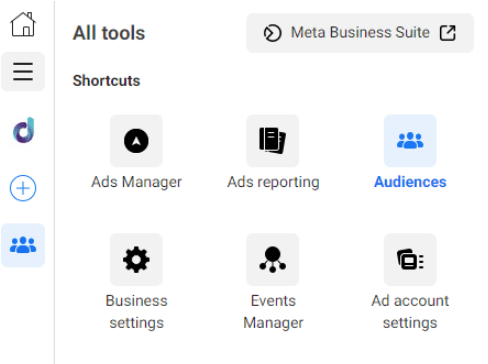
As always with Meta advertising, your journey begins at Ads Manager. To view your audience go to tools on the top left corner and click on ‘Audiences’. 

This will bring you to a list of all your existing audiences – allowing us to create new audiences or edit existing ones. 

This will bring you to a list of all your existing audiences – allowing us to create new audiences or edit existing ones. 


Saved Audiences:


By using saved audiences you can include or exclude people based on demographics, interests, and behaviours. This is referred to as detailed targeting audiences by Meta.


🎯Demographic Targeting – This allows you to target users based on various demographic data, such as age, gender, location, education level, and more. 


🎯Interest Targeting – This allows you to target users based on their hobbies, interests, and activities. 


🎯Behavioural Targeting – This allows you to target users based on their digital activities, purchase behaviour, mobile device, or consumer classification. 


Saved Audience’s best practices:


⚡ Detailed targeting works best the broader you can make it. If you narrow your target down too much you’re limiting the capabilities of Meta’s delivery system to show your ad to the right people – which will likely reduce the performance of your ad.

⚡ Turn on advantage detailed targeting, this is recommended by Meta to reach beyond your audience to drive the best performance for your ads. 


Custom Audiences:


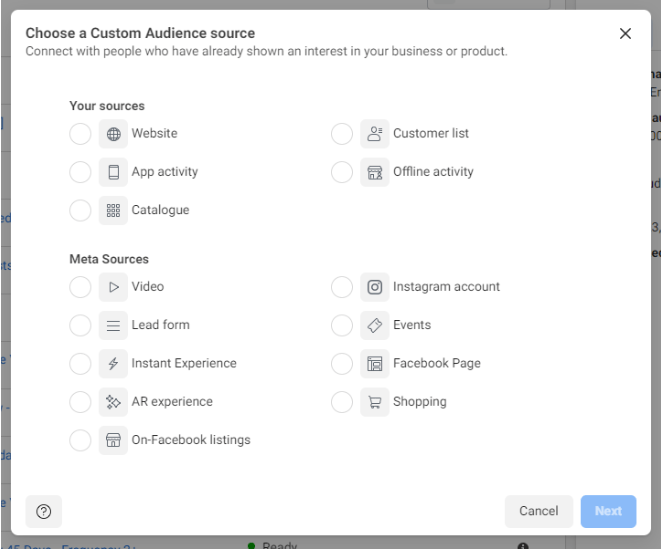
Custom audiences connect with those who have already connected with your business or product. You can use sources such as websites, app activity, customer lists and engagement to create these.

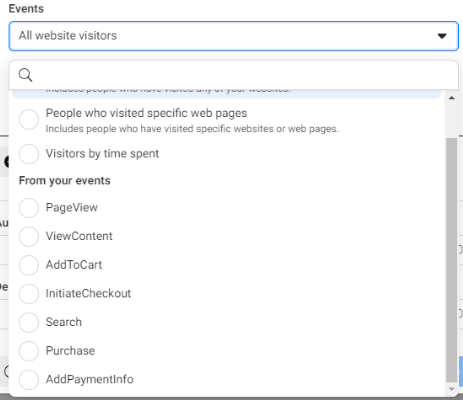
Website data is an important source as it allows you to target people who have visited specific pages of your website, and also people who have taken part in a number of events such as; Page View, View Content, Add To Cart, Initiate Checkout, Search, Purchase and, Add Payment Info. If you want to make it more specific there is an option to set the aggregated value. For example, View content > 2.


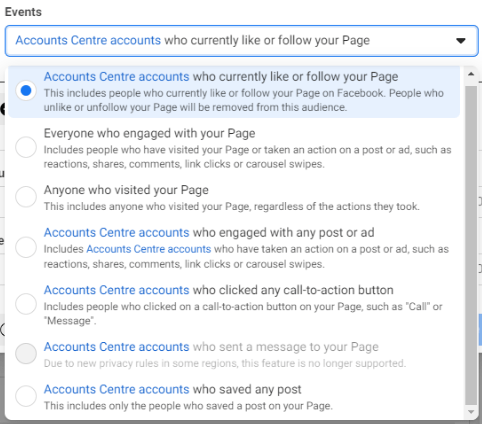
Another useful audience is catching your Instagram and Facebook engagers. By using the Instagram Account and Facebook Page Meta Source you can create audiences for people that follow your account, have engaged with a post or ad, or even saved a post.

There are so many audiences you can create so have a play around with it and see what you can come up with.

Custom Audiences Best Practices: 

⚡ If you are using custom audiences do not add detailed targeting as well. This can confuse Meta’s delivery system as it has too many criteria to work with, which can be detrimental to ad performance. 

⚡ When creating the audience give a clear name including the retention time that you have selected so you can easily find it when you’re using it within an ad in the future.

Lookalike Audiences:

Lookalike targeting allows you to target users who are similar to your existing customers or website visitors. These are created from existing custom audiences. When you set up a new custom audience you will be prompted to create a lookalike. These are ideal for businesses looking to expand their customer base by reaching users who are likely to be interested in their product or service. This is also a great audience to use if your custom audiences are too small to use within ads. 

Lookalike best practices:

⚡ It is best to start small. We would recommend you start with a 1% lookalike audience, these are the most similar to your data source and are likely to have the best outcome.

⚡ Having a high-quality data source is an important factor in whether or not the audience is likely to complete the desired action. Avoid making audiences for website visitors as many of these would have left without completing another event. Whereas, using add-to-cart sources contains people with higher intent.

Rounding It All Up

Our last piece of advice is to test, test, test! Testing is so valuable when advertising on Meta. My go-to structure to test an audience is setting up three different audiences within the ad set level of the campaign and seeing which one performs the best.

In conclusion, Meta’s targeting options are incredibly powerful tools that help businesses reach their desired audience effectively. By using demographic, interest, behavioural, and lookalike targeting options, businesses can create audiences that are most likely to engage with their ads and convert into customers. By leveraging Meta’s targeting capabilities, businesses can create more effective advertising campaigns and achieve their marketing objectives.

Untitled (250 × 250px)

A Guide To Advantage+ Campaigns

.Facebook’s Advantage+ campaigns were first rolled out in August 2022, so by now, you’ve probably had a chance to check them out. If you haven’t, don’t stress, I’m here to give you the lowdown on what it is and how it works.

What is Advantage+?

Advantage+ campaigns are designed to be the most efficient solution to drive sales, using machine-learning algorithms to target your ads to the right people. Meta offers a simplified setup process that takes care of many of the more manual tasks, such as audience targeting and creative options. These automated shopping campaigns can give you more opportunities to reach people interested in your product, whether you are new to Meta ads or have more experience.

What are the benefits?

Some of the key benefits that Advantage+ offers include:

  1. Simplified set-up: Advantage+ has streamlined the campaign setup process to make it super easy for you to do and reduce the manual work involved, such as bid strategy and ad optimisation.
  2. Machine-learning: Advantage+ uses machine learning to identify the highest-value audience across all Meta platforms to target your ads. This increases your opportunity to reach people that are more likely to convert.
  3. Streamlined performance goals: This helps you optimise to achieve the best outcome for your business.

However, the major drawback of these automated campaigns is that you have less control over the audience you are targeting. Additionally, the lack of freedom when optimising the campaign can impact your goals and objectives, meaning, these campaigns are not for everyone.

How to set up an Advantage+ campaign?

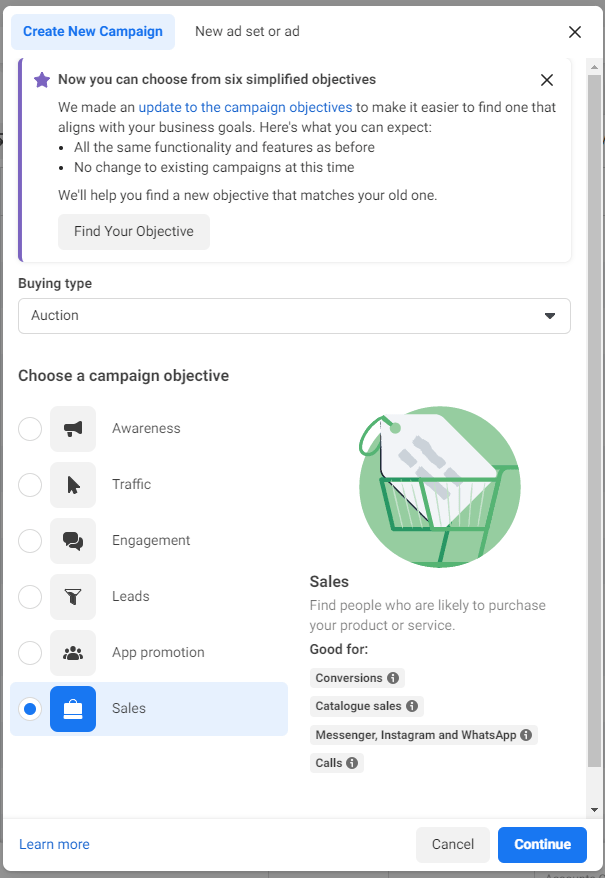
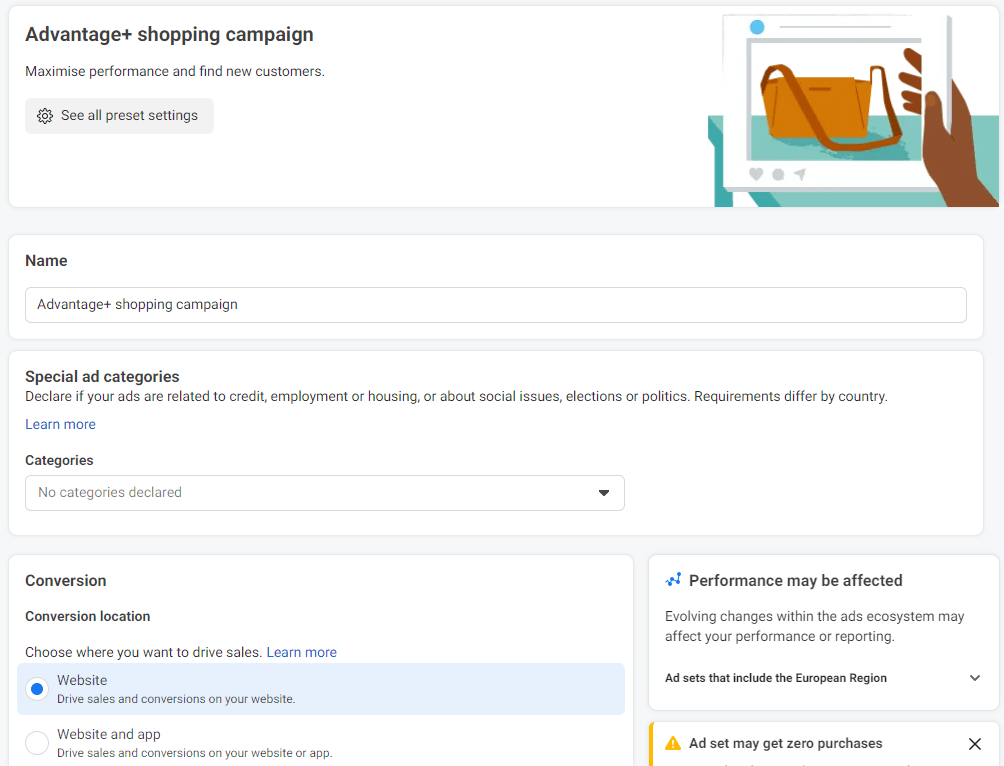
Go to Ads Manager and create a new campaign 

Select ‘Sales’ as the new campaign objective

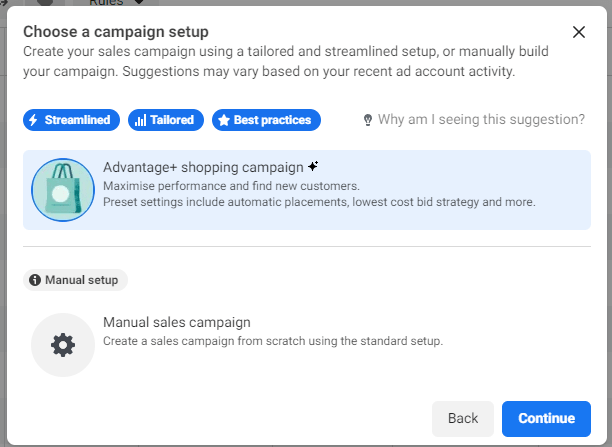
Choose the Advantage+ shopping campaign option

Manually input your campaign settings;

  1. Rename your campaign 
  2. Select ‘Conversion Location’
  3. Choose the correct Pixel and conversion event
  4. Select the audience location
  5. Set a daily budget and ad schedule 
  6. Choose the attribution setting for the campaign

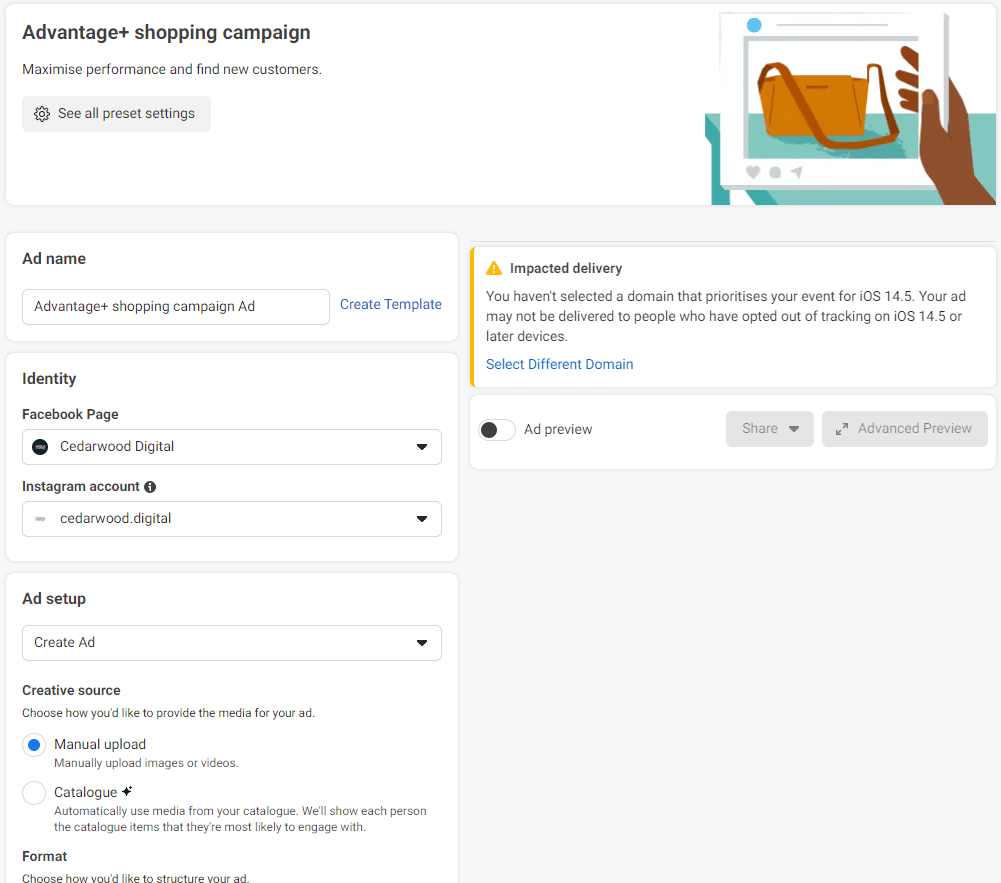
Then you will move on to the ad settings;

  1. Rename your ad
  2. Select your Facebook page and Instagram account
  3. Create a new ad or use an existing post and follow the instructions for ad setup and ad creative
  4. Ensure your website destination is correct
  5. Make sure your tracking is added

Once you’re happy with your new campaign, then review your edits and publish

What next?

If you are giving these campaigns a try, make sure that you have all tracking set up correctly with appropriate UTMs. Give your campaign time to go through the learning phase to allow it the best chance of success; try not to change the ad too drastically, otherwise, it will delay this period. And finally, once your campaign is active, be sure to regularly check its performance against KPIs to see if this is the right campaign style for you.

To conclude, Advantage+ campaigns are a simplified approach to getting the most out of your advertising budget. They are similar to Google’s Performance Max campaigns by using machine learning to optimise your campaigns. It’s great for all advertisers whether you’re a beginner or more experienced. If you haven’t already I would definitely recommend that you give these automated Advantage+ campaigns a try and see how they perform for your business. AI is on the rise in the marketing world, so it looks like these campaigns are here to stay.

Untitled design (57)

iOS 14.5 and the Effects on Meta Advertising.

Over a year has passed since the introduction of IOS14 & 14.5 which changed the landscape of Meta advertising. This blog will talk through the updates and the detrimental effects this ultimately had on paid social advertisers.

iOS 14 & 14.5 Update Changes – What is it?

Perhaps one of the most significant changes arising from the updates was that Apple limited the amount of data Meta could get from their users. Apple launched the App Transparency feature which asked the user for permission every time an app requested their IDFA (Apple’s Identifier for Advertisers). 

This prompt allows users to ask the app not to track and, if selected, prevents any user activity being tracked across company apps and websites.

Since Apple’s new privacy feature the rate of opt-in figures has, unsurprisingly, been low. According to Statista as of April 2022, the opt-in rate was at 25%.

What does this mean for Meta advertising?

With the majority of consumers choosing to opt out of data, there has been a significant impact on the amount of data marketers are now able to collect.

As a result of the update, Meta Pixel is now unable to track user’s activity properly, which is a big change to adjust to. Advertisers now report far fewer clicks on their advertisements as people choose to opt out of tracking. As a result, the conversions that are made cannot be reported on as granulary; for example, demographic data is no longer collected, meaning that advertisers can no longer use this information to personalise ads. Consequently, this has made it more difficult when optimising ads and caused a notable decrease in performance for all campaigns.

Another clear impact of the update is the lack of audience data that can be used for remarketing purposes. Meta audiences is one of the reasons that advertising through these platforms was so popular. Targeting users through lookalike, remarketing and custom audiences is now limited in its capabilities. To tackle this, campaigns should target a broader audience using interest marketing, this will allow Meta to use their own data to put your ads in front of people likely to convert. 

Aggregated Events Management

In addition to the reduction of user data that Meta can access, there is also no real-time reporting in Meta and results can take up to 3 days to appear. In response to this, Meta developed the aggravated events management system to help advertisers with reporting. This requires brands to limit their conversion events to 8 per domain. Meta Events Manager now only tracks the last single event made by the user, it’s therefore important to prioritise the order of conversion events. It’s also vital to have your domains verified in order to have this working effectively, so keep an eye out for the warning sign that will tell you if it’s not.

How can agencies respond to this new normal for Meta Ads? 

  1. Verify your domain: This tells Meta that you are a legitimate business and allows for the 8 conversion events to be assigned to that domain.
  1. Set up Aggregated Event Management: You can set up 8 conversion events. Meta will only track the last conversion event with the highest priority. 
  1. Target broad Audiences :Targeting large audiences with similar interests will allow Meta to put your ads in front of the right people. 

Summing up the IOS 14 & 14.5 Updates

The IOS 14 and 14.5 updates have had a huge impact on how advertisers utilise Meta for advertising. The updates mean it’s no longer as efficient as it has been before, but there are still things we can do to give our campaigns the best chance of succeeding. After all, advertisers are known for adapting to change and, as such, we must stay vigilant for any more updates in the paid social scene and run with these changes.

Find out how we work with the iOS changes and can help guide your social advertising
Untitled design (60)

Finding The Right Facebook Ad Type For Your Campaign

Facebook is continuously evolving and offering more and more new ad formats, but how do you know which one is best for you? This blog will walk you through the various formats, and help you choose which you should adopt to reach the right audience to help you hit your campaign goals.

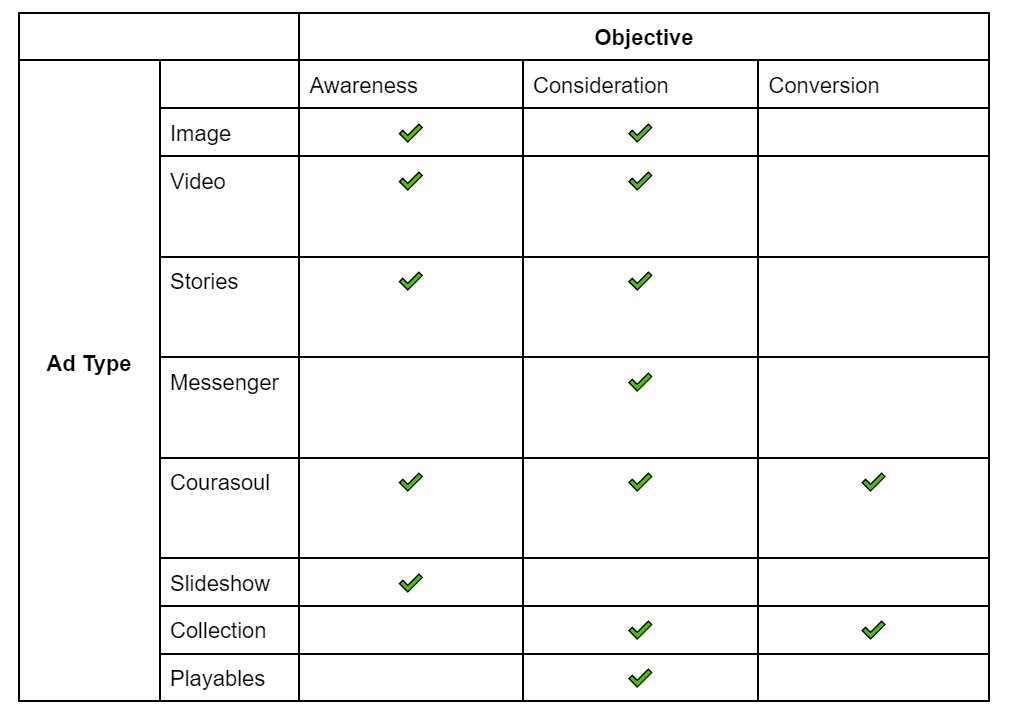
Image Ads

Image Ads are the most simple of the ad formats. You can use your own photos or create stock images to engage your audience. A picture, after all, is worth a thousand words, so don’t be afraid to get creative to attract your audience. Facebook’s creative hub allows you to test different image and text formats to find the best look for your advert.

These have the benefit of driving awareness of your business, can communicate a simple message to your audience and are quick and easy to create.

Video Ads

Video ads are a powerful way to showcase your products and services by using visuals and audio to capture your audience’s attention. These can be used to highlight a unique feature of your product or tell a story to drive awareness of your brand. Video ads can appear in a variety of placements including feeds, stories, reels, and many more.

The main advantages of this format are improved brand awareness, customer engagement, and increasing lead generation. So your choice is not limited when deciding to use a video ad.

Stories 

Stories provide an edge-to-edge experience to steal your audience’s attention with quick-frame videos and interesting ads. Stories can have a very large reach and a higher click-through rate. 

Unique ads can be used to increase customer interest and boost awareness of your products. 

Messenger

Messenger Ads are a perfect way to encourage customers to interact with your brand. The use of manual and automated features can be used to personalise your message to your existing or potential customers. 

Messenger ads are effective in reaching large numbers of people and starting conversations with your customers.

Carousel 

Carousel ads let you display as many as 10 images or videos within a single ad. Each image or video has a headline, link and call to action button, making it easy for the customer to navigate when clicking the ad.

Carousel ads are used best to:

  • Showcase multiple products in a single ad
  • – Highlight different features of a product or service, 
  • Take the user through a process 
  • Tell a story of your brand.

The main benefit of carousel is it increases consideration towards your brand and encourages people to actively engage with your product or service.

Slideshow

Slideshow ads contain different images that come together in a single harmonious slideshow. These are comparable to video but can be made on a smaller budget. Additionally, these are quick to create and can be set up easily from your Facebook page or phone. No matter how fast or slow the connection, these advertisements load quickly and play smoothly. 

These are most useful if you need to create an immersive ad quickly and inexpensively, and want to reach people with slower connections.

Collection 

Collection ads have the unique ability to tailor your catalogue to each individual. The usual format consists of one main image accompanied by 3 smaller images. When the customer clicks on the ad they will receive a full-page instant experience which allows customers to see the storefront, browse for products and make a purchase effortlessly. 

These are helpful if your campaign’s goal is to drive product awareness and increase conversions for your business. 

Playables

Playable Ads allow customers to interact with your app before they decide to install it. These ads consist of 3 components; a lead-in video, a demo and, finally, a call to action. These are most commonly used for gaming apps.

Playables are effective for engaging customers and driving actions, as the customer gets to have a preview of the app before they decide to download it.

Which ad format is best for me?

With all these different kinds of formats available to select, how do you know which one to choose?  It is crucial to define your target audience in order to know who to direct your ads at. Each ad format comes with its advantages so you need to select one that aligns with your campaign objectives. 

One more thing

It’s important to remember that Facebook is constantly evolving, so it’s critical to stay on top of the latest changes to ensure your business thrives on the meta platforms.

Get in touch today if you want to start integrating Facebook advertising into your marketing strategy.