MicrosoftTeams-image (18)

Leveraging Google Ads and SEO for Enhanced Online Visibility

Leveraging Google Ads and SEO for Enhanced Online Visibility.


In the ever-evolving digital landscape, gaining organic visibility for your brand can be a challenging endeavour. However, with the right strategies, such as utilising Google Ads and optimising for Search Engine Optimization (SEO), you can bridge gaps where organic visibility may be lacking. In this blog post, we will explore how leveraging Google Ads can enhance short-term visibility, especially against dominant competitors in the organic SERPs. Additionally, we will discuss how SEO can save costs for high-cost-per-click (CPC) keywords. By combining both PPC and SEO, businesses can establish a powerful and cost-effective marketing strategy.


Part 1: Using Google Ads to Cover Organic Visibility Gaps


1.1 Filling Organic Visibility Gaps:

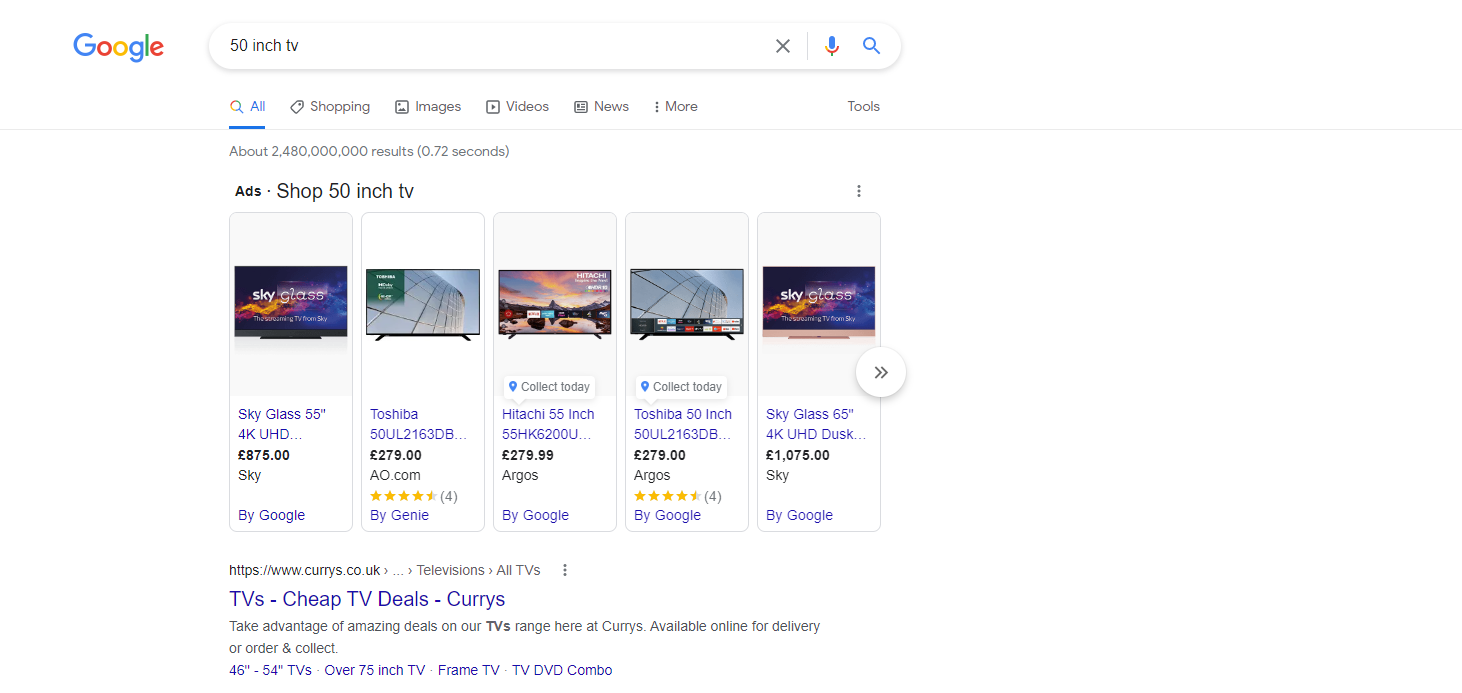
When there are certain keywords or search queries where your client’s website lacks organic visibility, Google Ads can come to the rescue. By targeting these specific keywords through pay-per-click (PPC) campaigns, you can ensure that your client’s ads appear prominently on relevant search engine results pages (SERPs). This allows you to reach a wider audience and gain immediate visibility, driving more traffic to your client’s website.


1.2 Overcoming Dominant Competitors:

In highly competitive industries where larger competitors with high domain authority dominate the organic SERPs, it can be difficult for smaller businesses to break through. However, Google Ads can provide a level playing field by enabling you to bid on keywords that your competitors are targeting organically. By strategically outbidding them, you can position your client’s ads above their organic listings, gaining increased visibility and effectively challenging their dominance.


Part 2: Harnessing SEO to Save Costs for High CPC Keywords


2.1 Utilising Organic Visibility for High CPC Keywords:

If your client has strong organic visibility for high-cost-per-click keywords, they can save significant advertising costs. By leveraging their existing organic visibility through SEO efforts, they can capitalise on the traffic they are already receiving without having to pay for every click. This strategic approach enables your client to allocate their budget to other marketing initiatives or expand their online presence without incurring additional expenses.


2.2 Maximising Long-Term Growth:

SEO plays a crucial role in building sustainable organic visibility over time. By investing in optimising your website’s content, architecture, and backlink profile, you can improve organic rankings and drive continuous organic traffic. As a result, your reliance on paid advertising for high CPC keywords decreases, resulting in substantial cost savings in the long run. SEO acts as a foundation for consistent visibility and ongoing growth without solely depending on PPC campaigns.


Conclusion:


In the dynamic world of digital marketing, it’s essential to adapt and utilise the available tools to maximise your client’s visibility. By leveraging Google Ads to cover organic visibility gaps and utilising SEO to save costs for high CPC keywords, businesses can establish a comprehensive and cost-effective marketing strategy. Google Ads helps overcome organic limitations and effectively compete against dominant competitors in the digital landscape. On the other hand, SEO offers a sustainable approach, minimising dependence on paid advertising for high-cost keywords. Integrating both PPC and SEO ensures enhanced online visibility, targeted traffic, and optimised marketing budgets, leading to long-term success in a competitive market.

 
PPC blog images (300 × 300px) (1)

Google Merchant Center: Optimising your products for position #1

Google Merchant Center: Optimising your products for position #1

If you have e-commerce clients, you’ll understand the importance of achieving maximum visibility for their products. Google Merchant Center plays a crucial role in driving conversions by allowing businesses to showcase their products through Google Shopping ads at the top of a Google Search page.

In this blog post, we will explore the significance of Google Merchant Center and share best practices to optimise your product listings to achieve the most desirable first position.

Understanding Google Merchant Center:

Google Merchant Center is a platform that allows businesses to upload their product data and make it available to potential customers through Google’s shopping channels, including Search, Shopping, and Images. The goal of this is to enhance the visibility of their offerings by showcasing elements like images, prices, special offers and compare these with other advertisers within the auctions. This allows for competitive advantages and therefore helps to attract customers to the business.

The Importance Of First Page Positions:

With paid shopping listings, it’s important to secure positions at the start of the shopping listing carousel as it makes products visible with no other interaction on the page. Achieving positions close to the front of the listing carousel provides significant advantages, including higher visibility, increased CTR, and a higher chance of conversions. In order to do this a strategic approach is needed alongside careful optimisation of your product data.

Key areas to focus on:

  1. Feed Optimisation:
    ⚡Ensure accurate product data: Provide precise information such as title, description, pricing, and availability. Avoid vague or misleading details that might frustrate users.

⚡The general best practices for the order of product titles are brand + product type + attributes (such as colour, size, material).

⚡Utilise relevant keywords: Conduct thorough keyword research and incorporate them naturally into your titles and descriptions. Focus on long-tail keywords that align with user intent.

⚡High-quality images: Use high-resolution, visually appealing product images that showcase your offerings. Ensure that the photos aren’t misleading showing more products that could lead the user to think that both are part of the listing. Optimise them for size and load speed without compromising quality.

⚡Detailed product attributes: Provide as much relevant information as possible, including colour, size, material, brand, and any other attributes that could influence a user’s decision.

2. Competitive Pricing and Offers: To stand out from your competitors, regularly analyse market trends and adjust your pricing strategy accordingly. Offer competitive prices, discounts, promotions, or exclusive deals to incentivise potential customers to choose your products over others.

3. Product Reviews and Ratings: Encourage customers to leave reviews and ratings for your products. Positive reviews not only boost consumer confidence but also influence Google’s algorithms, potentially improving your chances of securing higher positions.

4. Ad Campaign Optimisation: Combine your product listing efforts with Google search campaigns to enhance your visibility further. Implement well-structured, targeted campaigns that align with your product listings and optimise ad copy, bids, and targeting to improve ad relevancy and increase your chances of securing the top position.

Conclusion:

Optimising your product listings in Google Merchant Center is crucial for achieving a high position and maximising your Pmax and shopping campaign success. By following the tips outlined in this blog post, you can improve your chances of appearing at the top of Google’s shopping platforms, increasing visibility, attracting new customers, and driving conversions. Continuously monitor and refine your efforts to stay ahead of the competition and ensure your clients’ products receive the attention they deserve!

PPC blog images (300 × 300px) (2)

GA4 Cross-Channel Tracking

Google Analytics 4

Google Analytics 4 (GA4) is the latest version of Google’s web analytics platform, designed to help businesses gain insights into user behaviour across multiple devices and platforms. One of the significant changes in GA4 is the introduction of cross-channel tracking, which enables businesses to track conversions across different channels accurately. This is a significant advancement as it allows you to see precisely which channels influenced a conversion and allocate credit accordingly.


Cross-Channel Tracking

Cross-channel tracking in GA4 is a powerful tool that allows businesses to see how customers interact with their brand across different touchpoints. This, in turn, helps them to better understand the customer journey and optimize their marketing campaigns for maximum effectiveness. This means that you will be able to track your customer’s buying journey more precisely and be able to attribute the correct value to each touchpoint in the customer’s journey.


For instance, when it comes to Google Ads, this new feature will change the last non-direct click conversion import to full cross-channel credit, allowing you to see the complete value of your Google Ads campaigns.


To better understand the impact of this change, let’s consider a typical buyer journey. Suppose a customer clicks on a shopping ad but does not end up purchasing on day one. On day two, they organically search for the product and brand and complete the purchase. 


GA4 Last Non-Direct Click


Using the traditional last non-direct click tracking method, organic search would get 100% of the credit for this purchase. In contrast, Google Ads would not receive any credit for the conversion. 


GA4 Cross-Channel Credit

However, with the new GA4 cross-channel attribution, organic search would receive 50% of the credit, while Google Ads would get the remaining 50% – giving a 0.5 recording of a conversion in Google Ads. This means you can see which channels and campaigns are working best and making the most impact on your customer’s buying journey.


By using cross-channel tracking in GA4, you can now gain more visibility of how your campaigns are actually influencing the customer’s purchase journey. This provides more comprehensive data that can help you optimize your marketing campaigns better. It’s now possible to see how different channels work together to convert a customer, which can help identify areas for improvement in your marketing strategy. This allows you to make data-driven decisions about where to allocate marketing resources, ensuring that you get the best possible return on investment.


To set up conversion tracking in GA4, businesses need to define the specific events that they want to track as conversions. These events can be defined using the built-in events that are available in GA4 or you can create your own custom events. Once these conversion events are defined, you can use cross-channel tracking to track conversions across different platforms and devices.

Conclusion

In conclusion, the upcoming changes to GA4 conversion tracking using cross-channel tracking will provide businesses with a more comprehensive view of their customer journey, enabling them to optimize their marketing campaigns for maximum effectiveness. By attributing the correct value to each touchpoint in the customer’s journey, businesses can make better-informed decisions on their marketing strategies and drive more value from their campaigns.


PPC blog images (300 × 300px) (1)

Meta Targeting 101

With Meta’s social media platforms being some of the largest in the world, it would be foolish not to advertise there. With over 2 billion users, Meta targeting options allow advertisers to hone in on specific demographics and interests, making it ideal to reach your desired audiences. In this blog post, we will take a closer look at the different targeting options available on Meta and how to use them effectively.

Audience Options

As always with Meta advertising, your journey begins at Ads Manager. To view your audience go to tools on the top left corner and click on ‘Audiences’. 

This will bring you to a list of all your existing audiences – allowing us to create new audiences or edit existing ones. 

This will bring you to a list of all your existing audiences – allowing us to create new audiences or edit existing ones. 


Saved Audiences:


By using saved audiences you can include or exclude people based on demographics, interests, and behaviours. This is referred to as detailed targeting audiences by Meta.


🎯Demographic Targeting – This allows you to target users based on various demographic data, such as age, gender, location, education level, and more. 


🎯Interest Targeting – This allows you to target users based on their hobbies, interests, and activities. 


🎯Behavioural Targeting – This allows you to target users based on their digital activities, purchase behaviour, mobile device, or consumer classification. 


Saved Audience’s best practices:


⚡ Detailed targeting works best the broader you can make it. If you narrow your target down too much you’re limiting the capabilities of Meta’s delivery system to show your ad to the right people – which will likely reduce the performance of your ad.

⚡ Turn on advantage detailed targeting, this is recommended by Meta to reach beyond your audience to drive the best performance for your ads. 


Custom Audiences:


Custom audiences connect with those who have already connected with your business or product. You can use sources such as websites, app activity, customer lists and engagement to create these.

Website data is an important source as it allows you to target people who have visited specific pages of your website, and also people who have taken part in a number of events such as; Page View, View Content, Add To Cart, Initiate Checkout, Search, Purchase and, Add Payment Info. If you want to make it more specific there is an option to set the aggregated value. For example, View content > 2.


Another useful audience is catching your Instagram and Facebook engagers. By using the Instagram Account and Facebook Page Meta Source you can create audiences for people that follow your account, have engaged with a post or ad, or even saved a post.

There are so many audiences you can create so have a play around with it and see what you can come up with.

Custom Audiences Best Practices: 

⚡ If you are using custom audiences do not add detailed targeting as well. This can confuse Meta’s delivery system as it has too many criteria to work with, which can be detrimental to ad performance. 

⚡ When creating the audience give a clear name including the retention time that you have selected so you can easily find it when you’re using it within an ad in the future.

Lookalike Audiences:

Lookalike targeting allows you to target users who are similar to your existing customers or website visitors. These are created from existing custom audiences. When you set up a new custom audience you will be prompted to create a lookalike. These are ideal for businesses looking to expand their customer base by reaching users who are likely to be interested in their product or service. This is also a great audience to use if your custom audiences are too small to use within ads. 

Lookalike best practices:

⚡ It is best to start small. We would recommend you start with a 1% lookalike audience, these are the most similar to your data source and are likely to have the best outcome.

⚡ Having a high-quality data source is an important factor in whether or not the audience is likely to complete the desired action. Avoid making audiences for website visitors as many of these would have left without completing another event. Whereas, using add-to-cart sources contains people with higher intent.

Rounding It All Up

Our last piece of advice is to test, test, test! Testing is so valuable when advertising on Meta. My go-to structure to test an audience is setting up three different audiences within the ad set level of the campaign and seeing which one performs the best.

In conclusion, Meta’s targeting options are incredibly powerful tools that help businesses reach their desired audience effectively. By using demographic, interest, behavioural, and lookalike targeting options, businesses can create audiences that are most likely to engage with their ads and convert into customers. By leveraging Meta’s targeting capabilities, businesses can create more effective advertising campaigns and achieve their marketing objectives.

PPC blog images (300 × 300px)

PMax Vs. Shopping Campaigns: Which Is Right For You?

PMax Vs. Shopping Campaigns

Performance Max has been a buzzword among digital marketers since its release. It is Google’s newest advertising solution that utilises machine learning to optimise ad performance across multiple Google networks. 


Many advertisers have claimed that Performance Max campaigns have delivered significant results, but is it always the best solution for every scenario – what happens when the latest and greatest technology fails to deliver the desired results? That’s what we recently experienced with a client who was going through a rough patch of low search volume and low purchase intent. Despite the sophisticated algorithms in Performance Max, the campaigns were struggling to deliver results. Daily budgets were not being hit, CPCs were rising, and revenue was not being generated at the required volume.


After much frustration, we made a bold move and switched back to traditional shopping campaigns. After just a few days of optimization, we saw a substantial increase in volume, leading to a remarkable 184% increase in revenue compared to the previous period. The return on ad spend also increased, so they weren’t sacrificing profitability for volume.


The experience was a reminder that sometimes the latest and greatest technology isn’t always the best solution for every scenario. It’s important to stay flexible and adaptable in our approach to advertising and be willing to switch back to tried and true methods when the situation calls for it.


While Performance Max campaigns are undoubtedly effective at delivering results, they can sometimes lack the human understanding of the need to drive volume, especially in times of low intent. Standard shopping campaigns, on the other hand, are designed to capture users who are actively searching for products, regardless of their level of intent. By targeting these users with a more volume-driven approach, the agency was able to generate impressive results despite the challenging search environment.


So while Performance Max campaigns can be a great tool for certain situations, it’s important to recognize their limitations and be willing to experiment with other approaches when the situation demands it. Sometimes, the best ideas are the ones that go against the grain. Being willing to challenge the status quo, experiment with new ideas, and take calculated risks in our advertising campaigns is key to unlocking untapped potential.


With this in mind, let’s dig into the pros and cons of each campaign type to help you decide what would work best for your accounts.

Performance Max

Benefits: 

➡️ Advanced targeting capabilities: Performance Max leverages machine learning algorithms to automatically target relevant audiences across multiple channels and platforms, making it easier to reach potential customers.

➡️ Increased efficiency: Performance Max automates many of the tedious tasks involved in managing advertising campaigns, such as bid adjustments, ad placements, and audience targeting, freeing up time for marketers to focus on higher-level strategic initiatives.

➡️ Enhanced visibility: Performance Max allows advertisers to show their ads across a variety of Google networks, including search, display, and YouTube, providing greater visibility and exposure to potential customers.


Drawbacks:

➡️ Limited control over ad placement: While Performance Max automates many aspects of campaign management, it also limits control over where ads are placed and how they are displayed, which can be problematic for some advertisers.

➡️ High minimum spend requirements: Performance Max campaigns often have high minimum spend requirements, which can be a barrier to entry for smaller businesses and advertisers with limited budgets.

➡️ Limited transparency and insights: Performance Max provides limited visibility into the performance of individual ads, which can make it difficult for advertisers to identify and address issues or optimise their campaigns.

Standard Shopping

Benefits:

➡️ More granular campaign management: With Standard Shopping campaigns, advertisers have more granular control over the campaign structure, including the ability to create specific product groups, set bids at the product level, and tailor ad copy and landing pages to individual products or categories.

➡️ Easy to get started: Standard Shopping campaigns are relatively easy to set up and manage, making them a good option for advertisers who are new to Google Ads or who don’t have a lot of experience with advanced targeting capabilities.

➡️ Better suited for specific goals: Standard Shopping campaigns may be better suited for specific advertising goals, such as driving sales of a specific product or category, while Performance Max campaigns may be better suited for broader awareness campaigns.


Drawbacks:

➡️ Limited automation: Standard Shopping campaigns offer limited automation capabilities compared to Performance Max, which can make campaign management more time-consuming and labour-intensive.

➡️ More limited targeting capabilities: Standard Shopping campaigns do not offer the same advanced targeting capabilities as Performance Max, which can make it more challenging to reach specific audiences or optimise campaigns for specific goals.

➡️ Limited visibility across multiple platforms: Standard Shopping campaigns are typically limited to Google’s Shopping network, which may limit visibility and exposure compared to Performance Max campaigns, which can show ads across multiple platforms and networks.

Key Takeaways

So, what can we learn from this experience? Here are some takeaways:

💡Be flexible and adaptable in your approach to advertising. Just because a particular campaign type or technology is popular doesn’t mean it’s the right fit for every situation.

💡Don’t be afraid to experiment with new ideas and take calculated risks. You never know what might work until you try it.

💡Measure and analyse your results regardless of what approach you take. It’s important to measure and analyse your results to identify what’s working and what’s not based on what you are trying to achieve.

Untitled (250 × 250px)

A Guide To Advantage+ Campaigns

.Facebook’s Advantage+ campaigns were first rolled out in August 2022, so by now, you’ve probably had a chance to check them out. If you haven’t, don’t stress, I’m here to give you the lowdown on what it is and how it works.

What is Advantage+?

Advantage+ campaigns are designed to be the most efficient solution to drive sales, using machine-learning algorithms to target your ads to the right people. Meta offers a simplified setup process that takes care of many of the more manual tasks, such as audience targeting and creative options. These automated shopping campaigns can give you more opportunities to reach people interested in your product, whether you are new to Meta ads or have more experience.

What are the benefits?

Some of the key benefits that Advantage+ offers include:

  1. Simplified set-up: Advantage+ has streamlined the campaign setup process to make it super easy for you to do and reduce the manual work involved, such as bid strategy and ad optimisation.
  2. Machine-learning: Advantage+ uses machine learning to identify the highest-value audience across all Meta platforms to target your ads. This increases your opportunity to reach people that are more likely to convert.
  3. Streamlined performance goals: This helps you optimise to achieve the best outcome for your business.

However, the major drawback of these automated campaigns is that you have less control over the audience you are targeting. Additionally, the lack of freedom when optimising the campaign can impact your goals and objectives, meaning, these campaigns are not for everyone.

How to set up an Advantage+ campaign?

Go to Ads Manager and create a new campaign 

Select ‘Sales’ as the new campaign objective

Choose the Advantage+ shopping campaign option

Manually input your campaign settings;

  1. Rename your campaign 
  2. Select ‘Conversion Location’
  3. Choose the correct Pixel and conversion event
  4. Select the audience location
  5. Set a daily budget and ad schedule 
  6. Choose the attribution setting for the campaign

Then you will move on to the ad settings;

  1. Rename your ad
  2. Select your Facebook page and Instagram account
  3. Create a new ad or use an existing post and follow the instructions for ad setup and ad creative
  4. Ensure your website destination is correct
  5. Make sure your tracking is added

Once you’re happy with your new campaign, then review your edits and publish

What next?

If you are giving these campaigns a try, make sure that you have all tracking set up correctly with appropriate UTMs. Give your campaign time to go through the learning phase to allow it the best chance of success; try not to change the ad too drastically, otherwise, it will delay this period. And finally, once your campaign is active, be sure to regularly check its performance against KPIs to see if this is the right campaign style for you.

To conclude, Advantage+ campaigns are a simplified approach to getting the most out of your advertising budget. They are similar to Google’s Performance Max campaigns by using machine learning to optimise your campaigns. It’s great for all advertisers whether you’re a beginner or more experienced. If you haven’t already I would definitely recommend that you give these automated Advantage+ campaigns a try and see how they perform for your business. AI is on the rise in the marketing world, so it looks like these campaigns are here to stay.

Untitled design (57)

iOS 14.5 and the Effects on Meta Advertising.

Over a year has passed since the introduction of IOS14 & 14.5 which changed the landscape of Meta advertising. This blog will talk through the updates and the detrimental effects this ultimately had on paid social advertisers.

iOS 14 & 14.5 Update Changes – What is it?

Perhaps one of the most significant changes arising from the updates was that Apple limited the amount of data Meta could get from their users. Apple launched the App Transparency feature which asked the user for permission every time an app requested their IDFA (Apple’s Identifier for Advertisers). 

This prompt allows users to ask the app not to track and, if selected, prevents any user activity being tracked across company apps and websites.

Since Apple’s new privacy feature the rate of opt-in figures has, unsurprisingly, been low. According to Statista as of April 2022, the opt-in rate was at 25%.

What does this mean for Meta advertising?

With the majority of consumers choosing to opt out of data, there has been a significant impact on the amount of data marketers are now able to collect.

As a result of the update, Meta Pixel is now unable to track user’s activity properly, which is a big change to adjust to. Advertisers now report far fewer clicks on their advertisements as people choose to opt out of tracking. As a result, the conversions that are made cannot be reported on as granulary; for example, demographic data is no longer collected, meaning that advertisers can no longer use this information to personalise ads. Consequently, this has made it more difficult when optimising ads and caused a notable decrease in performance for all campaigns.

Another clear impact of the update is the lack of audience data that can be used for remarketing purposes. Meta audiences is one of the reasons that advertising through these platforms was so popular. Targeting users through lookalike, remarketing and custom audiences is now limited in its capabilities. To tackle this, campaigns should target a broader audience using interest marketing, this will allow Meta to use their own data to put your ads in front of people likely to convert. 

Aggregated Events Management

In addition to the reduction of user data that Meta can access, there is also no real-time reporting in Meta and results can take up to 3 days to appear. In response to this, Meta developed the aggravated events management system to help advertisers with reporting. This requires brands to limit their conversion events to 8 per domain. Meta Events Manager now only tracks the last single event made by the user, it’s therefore important to prioritise the order of conversion events. It’s also vital to have your domains verified in order to have this working effectively, so keep an eye out for the warning sign that will tell you if it’s not.

How can agencies respond to this new normal for Meta Ads? 

  1. Verify your domain: This tells Meta that you are a legitimate business and allows for the 8 conversion events to be assigned to that domain.
  1. Set up Aggregated Event Management: You can set up 8 conversion events. Meta will only track the last conversion event with the highest priority. 
  1. Target broad Audiences :Targeting large audiences with similar interests will allow Meta to put your ads in front of the right people. 

Summing up the IOS 14 & 14.5 Updates

The IOS 14 and 14.5 updates have had a huge impact on how advertisers utilise Meta for advertising. The updates mean it’s no longer as efficient as it has been before, but there are still things we can do to give our campaigns the best chance of succeeding. After all, advertisers are known for adapting to change and, as such, we must stay vigilant for any more updates in the paid social scene and run with these changes.

Find out how we work with the iOS changes and can help guide your social advertising
Untitled design (58)

Google Shopping Explained

Google Shopping is a great way to advertise your products and generate sales as an E-commerce store. It’s a shopping comparison service for searchers where retailers compete to get their products in front of users who are searching online for them.

Why use Google Shopping Ads?

Unlike Google’s main other campaign type – Search (AKA text ads), these ads include an image of your product as well as the title, price and shop name. Shopping Ads provide more information to the users who are searching for your products, which helps to bring in more qualified leads. Shopping Ads show up at the top of the Google SERP in a scrollable banner format above organic results, and even above text ads. This means they are the first thing a user will see when they’re searching for a product, making them very powerful for growing revenue.

Graphical user interface, text, website

Description automatically generated

How do Google Shopping Ads Work?

Shopping ads are created automatically by Google through your product feed, which is a file you upload to Google Merchant Centre containing all of your products and their information, such as price, description, delivery costs etc. So, unlike text ads, there is no need to write ad copy. Google will simply use the information you provide in the product feed to create the ad content. The ad will contain the product title, price and image, as well as extra information, if available, such as reviews. As the information that builds the ad comes from your product feed, the data inputted to the feed must be accurate and of high quality, to ensure it appears in searches. Once a user clicks on your ad, they will be directed straight to the product page on your website where they can ‘add to basket’ and complete the purchase.

Shopping ads also tend to have lower cost-per-click than text ads, which means they are a more cost-effective advertising platform, helping to generate more ROI. This makes Shopping ads extremely valuable to online shops as they bring in higher quality leads due to the extra information given to the user, and are cheaper when users do click. 

Step 1: Set Up Google Merchant Centre & Upload A Product Feed

This is the most time-consuming part of the process but, once done, your Shopping Ad campaigns will be much easier to manage than if you were to advertise the same items through Google Search Campaigns. In Google Merchant Centre, simply upload a product feed using either a Google Sheet or an XML file. Google has handy templates for you to use to help create the feed. 

Graphical user interface, text, application, email

Description automatically generated

Some e-commerce platform providers, such as Shopify or WooCommerce, have direct integrations with Google Merchant Centre, meaning you can manage both your website catalogue and Google product feed simultaneously. This makes this step a lot simpler. Check your e-commerce platform provider to see if yours will work with Google Merchant Centre.

Once done, link your Google Ads account to your Merchant Centre by heading to the gear icon at the top right, and heading to the linked accounts section.

After your product feed is uploaded, you will be moving to Google Ads to optimise your campaigns. One more thing to mention before moving over to Google Ads is the “Promotions” feature on Google Merchant Centre. Here, you can set up promotions such as monetary or percentage discounts, free gifts and free shipping, to reflect any sales or promotions you may be offering on your website. 

If you are running a promotion on a specific set of products, you can use the [promo_id] attribute within your product feed to mark products you want to include in sales; this way, only those with the correct promotion ID will be included. 

You can also create custom filters based on your product attributes within the promotion set up, allowing you to select products for your promotion by the attributes you’ve set them in the feed.

Step 2: Create your campaign(s)

Now you can move to Google Ads and start to set up your shopping campaigns. On the campaign tab, press the blue “+” button to set up a new campaign. Select your campaign goal as “Sales” and campaign type as “Shopping”.  Make sure you have conversion tracking set up in order to properly measure the performance of your campaigns and product sales through Google Ads.

Graphical user interface, application

Description automatically generated

Before continuing to the next step, make sure you switch to the “Standard Shopping campaign” selection – this will give you manual control over bid levels which is useful for new users when getting to grips with Google Ads.

Graphical user interface, text, application

Description automatically generated

On the next page you will be able to set the daily budget and bid levels to your desired amounts, as well as targeting options such as locations and devices.

Step 3: Segment your products by attributes

Now, in your newly created campaign(s), you can segment your products by the attributes you set in the feed. A standard segmentation used by a lot of advertisers is to separate their products by Brand, but this may not be the best approach for everyone. By splitting out products in the product groups, you can bid different amounts on different brands, product categories, and even down to product specific bids. You can also exclude products from your campaigns if you do not wish to advertise them.

Step 4: Optimise

Once your campaign is live, you will be able to see how much your products are spending, how much revenue they are generating and other helpful data such as Search Impression Share (the percentage of times your ad showed when eligible). Use this to gauge the performance of your products and adjust your bids and budgets in accordance with your marketing goals.

Summary

Google Shopping is a really effective tool for both advertisers and shoppers. By using Google Shopping, advertisers can showcase their products in a very visual way to potential customers. It’s therefore a great way to boost website traffic and sales. It’s also much more cost effective than other text-heavy advertising options, so if you haven’t tried it yet this could be an ideal tool for your business.

Untitled design (60)

Finding The Right Facebook Ad Type For Your Campaign

Facebook is continuously evolving and offering more and more new ad formats, but how do you know which one is best for you? This blog will walk you through the various formats, and help you choose which you should adopt to reach the right audience to help you hit your campaign goals.

Image Ads

Image Ads are the most simple of the ad formats. You can use your own photos or create stock images to engage your audience. A picture, after all, is worth a thousand words, so don’t be afraid to get creative to attract your audience. Facebook’s creative hub allows you to test different image and text formats to find the best look for your advert.

These have the benefit of driving awareness of your business, can communicate a simple message to your audience and are quick and easy to create.

Video Ads

Video ads are a powerful way to showcase your products and services by using visuals and audio to capture your audience’s attention. These can be used to highlight a unique feature of your product or tell a story to drive awareness of your brand. Video ads can appear in a variety of placements including feeds, stories, reels, and many more.

The main advantages of this format are improved brand awareness, customer engagement, and increasing lead generation. So your choice is not limited when deciding to use a video ad.

Stories 

Stories provide an edge-to-edge experience to steal your audience’s attention with quick-frame videos and interesting ads. Stories can have a very large reach and a higher click-through rate. 

Unique ads can be used to increase customer interest and boost awareness of your products. 

Messenger

Messenger Ads are a perfect way to encourage customers to interact with your brand. The use of manual and automated features can be used to personalise your message to your existing or potential customers. 

Messenger ads are effective in reaching large numbers of people and starting conversations with your customers.

Carousel 

Carousel ads let you display as many as 10 images or videos within a single ad. Each image or video has a headline, link and call to action button, making it easy for the customer to navigate when clicking the ad.

Carousel ads are used best to:

  • Showcase multiple products in a single ad
  • – Highlight different features of a product or service, 
  • Take the user through a process 
  • Tell a story of your brand.

The main benefit of carousel is it increases consideration towards your brand and encourages people to actively engage with your product or service.

Slideshow

Slideshow ads contain different images that come together in a single harmonious slideshow. These are comparable to video but can be made on a smaller budget. Additionally, these are quick to create and can be set up easily from your Facebook page or phone. No matter how fast or slow the connection, these advertisements load quickly and play smoothly. 

These are most useful if you need to create an immersive ad quickly and inexpensively, and want to reach people with slower connections.

Collection 

Collection ads have the unique ability to tailor your catalogue to each individual. The usual format consists of one main image accompanied by 3 smaller images. When the customer clicks on the ad they will receive a full-page instant experience which allows customers to see the storefront, browse for products and make a purchase effortlessly. 

These are helpful if your campaign’s goal is to drive product awareness and increase conversions for your business. 

Playables

Playable Ads allow customers to interact with your app before they decide to install it. These ads consist of 3 components; a lead-in video, a demo and, finally, a call to action. These are most commonly used for gaming apps.

Playables are effective for engaging customers and driving actions, as the customer gets to have a preview of the app before they decide to download it.

Which ad format is best for me?

With all these different kinds of formats available to select, how do you know which one to choose?  It is crucial to define your target audience in order to know who to direct your ads at. Each ad format comes with its advantages so you need to select one that aligns with your campaign objectives. 

One more thing

It’s important to remember that Facebook is constantly evolving, so it’s critical to stay on top of the latest changes to ensure your business thrives on the meta platforms.

Get in touch today if you want to start integrating Facebook advertising into your marketing strategy.

Untitled design (66)

Using ValueTrack Parameters To Improve Your Display Campaigns

Display Advertising is, in my opinion, one of the most under-utilised forms of effective advertising offered in performance marketing. The main reason I feel people don’t really use it effectively is because, of all the paid search options available, it is often the hardest to optimise and also the hardest to attribute.

Unlike traditional advertising such as Search or Shopping, Display generally has a much longer path to conversion. It can take many more touchpoints than the standard options which, in many cases, can just take one or two. The second and probably biggest challenge with Display Advertising is that, unlike Shopping or Search, it is an interest-based form of advertising rather than an intent-based format. This means that instead of benefitting from putting your ad in front of someone at the time they are looking for it, you are instead trying to find that audience through a range of targeting options, such as age/demographic, interests and affinity audiences.

With this in mind, you often find that Display doesn’t convert as well as traditional channels. The Conversion Rate tends to be lower and the user much further outside the funnel so, for many advertisers, it falls by the wayside as an effective channel option. This is a shame, as Display can be a great way to reach a broader audience for your product and bring them into your funnel, even if it doesn’t directly convert. It can actually be a powerful tool when used effectively.

Given the broad nature of interest-based targeting, to utilise Display Advertising effectively we need to be as granular as possible and use a strong, data-driven approach in our targeting methods. In addition to having a really good understanding of our audience and where we want the ads to be placed, we also need to understand which ads are working well for us and which placements are leading to conversions. That’s where, when using ValueTrack Parameters effectively, you can really improve the performance of your Display campaigns.

What Are ValueTrack Parameters?

According to Google who created them, ValueTrack Parameters are “a type of URL parameter that you can add to your ads’ landing page URLs. These parameters collect information about the source of your ad clicks.” Essentially, they are parameters which you apply to your ads that allow you to collate data about the click (location, type of ad etc…) and feed that back into your advertising interface to allow you to make more data-driven decisions. 

By utilising ValueTrack Parameters you are able to gain more information about your audience and their behaviour than you would traditionally through the advertising interface. This can allow you to make more data-driven decisions and more effectively place your display ads in areas where you are likely to get the best return. 

There are a whole range of parameters that you can use across the full range of advertising channels (Display, Search, Shopping, Video). They include parameters to measure devices, placements, positions, user data and location. These have all been designed to give you additional insight and data to really maximise the value of your campaigns. 

Are There Specific ValueTrack Parameters I Should Use For Display?

If you’re looking to optimise your Display Campaigns then there are a number of ValueTrack Parameters that we would recommend using. These will help to add additional data and detail to your campaigns, allowing you to really maximise their optimisation:

{PLACEMENT}

The Placement ValueTrack Parameter gives you access to the domain name of the specific website where your ad was published. This can be an incredibly effective way of mapping specific conversions back to specific placements, and allowing you to be more granular with the way that you place your content.

By using the placement parameter it allows you to really understand which placements are delivering you high quality leads and which ones aren’t. Additionally, this then allows you to block out placements which aren’t driving value and increase bids on those which are. The Google Display Network covers around 90% of the web which means a standard display campaign will appear on thousands and thousands of websites. By utilising the placement parameter you can really help to isolate high performance placements and maximise these for a better ROAS.

{DEVICEMODEL}

The Devicemodel parameter allows you to evaluate what make and model of device users are on when they click on your ads and come through to your website. This, again, can give really valuable information around how you target your campaigns and, specifically, how you create your ads. 

With this data you can evaluate if a particular user group (i.e. on a particular make or model of device) is interacting poorly with either your ads or your website when they arrive. As a result, it could indicate an issue with the way they are viewing your ads, or even indicate that they are missing specific information from them due to the way the ad displays on their screen or device. This particular parameter can help to cut out a lot of wastage and can also push advertisers to ensure that their ads are suitable for a wide range of devices and models. So, if you are finding a drop off in your ads, or when users come through to the website, this is one method of investigation which can provide very useful data.

{CREATIVE}

The Creative parameter is a great way of identifying which of your specific creatives are driving valuable conversions to your website. When combined with the {placement} parameter it gives you an invaluable insight into which creative on which placement is actually driving your leads. This allows you to really maximise visibility in areas where you know there is a high potential for conversion. 

With Display campaigns you will often trial and run a number of different creative options and it’s often hard to discern which of these is generating the best return. By implementing the creative parameter and combining it with others you can get a full data mix to understand what’s really driving ROAS for your business. This is one of the most effective ways to get display campaigns delivering a strong ROAS as opposed to just improving your visibility.

How Do I Set Up ValueTrack Parameters On My Campaigns?

If you like what you’ve read above and this is something you are looking to get involved with, Google offers a handy guide which can help you get started with setting up the parameters on your campaigns. If you’re looking to get started quickly then here’s a snippet from the Google guidelines below which indicates the quick steps to set up the parameters:

Graphical user interface, text

Description automatically generated

The key here is in choosing the right parameters and understanding how you want to digest that data. I’d recommend setting it out in a spreadsheet first, understanding exactly what you want to measure, which campaigns you are going to test it on and how you are going to measure the data. Then apply the parameters to a subset of data to test initially.

Once the test has been undertaken (and it may be valuable to do this within a Google Ads Experiment) you can then roll this out across more campaigns to get a larger pool of data to work with.

Conclusion

If you are looking to take your display campaigns to the next level, or perhaps you’ve stepped away from them because you don’t feel that they are generating the ROAS that you deserve, then it’s worth considering how ValueTrack parameters could help. They could really bring that display campaign back in a very targeted approach and allow you to cut a lot of wastage.

By applying some simple parameters you can better understand your audience and the data available, allowing you to really maximise your campaigns.

Want to find out more about how to maximise your return from display advertising? Get in touch!

Untitled design (72)

Performance Max – Everything You Need To Know

So by now you’ve probably heard about the introduction of Performance Max & the sunsetting on Smart Shopping. Some may be worried about what this means for their campaigns, as we know Google’s changes aren’t always the best in the eyes of an advertiser. However, I’m here to run through what Performance Max is, how it works & how you can get the best out of it. 

What is Performance Max?

Don’t be put off by the name – this isn’t a completely new product. It still acts in the same way as Smart Shopping but takes machine learning and visibility to the next level, incorporating more channels than ever before. This means that advertisers can now reach more customers from just one campaign, letting Google’s machine learning & automation optimise bids & placements that are based around your budgets, goals & conversions. Performance Max is essentially Smart Shopping Plus.

How does it work?

Performance Max is a goal based campaign type that allows users to access a wider range of the Google Network including:

  • • YouTube
  • • Display
  •  Search
  •  Discover
  •  Gmail
  •  Maps
Across_Google_channels.max-1000x1000
Source: Google

Building on the “Standard Shopping” & “Display Remarketing” combination of Smart Shopping, Performance Max also brings new opportunities by adding “Dynamic Search Ads” to the mix. This complements existing Search Keywords within the account but acts as a catch-all to ensure that advertisers are not missing out on any sales.

As I said before, this is a goal based campaign & in honour of its name, the main focus of these campaigns is to drive performance based on the specific conversion goals that you set. 

How do I set a Performance Max campaign up?

Google automates the targeting of Performance Max campaigns based on the information that you provide. Primarily, this is the budget & the campaign goal which gives the constraints to which the campaign needs to adhere to. Performance Max uses asset groups which are a collection of creatives centred on a theme or related to a target audience. Advertisers also need to provide the following creative assets which consist of:

  • • Final URL
  • • Up to 15 Images
  • • Up to 5 Logos
  • • Up to 5 Videos (Google has autocreated videos if you don’t provide any but honestly, if you have the resource, it is definitely worth creating these yourself as the auto-created ones aren’t the best)
  • • Up to 5 Headlines
  • • Up to 5 Long Headlines
  • • Up to 5 Descriptions
  • • Call To Action
  • • Business Name

However, new updates from Google’s Ads Liaison, Ginny Marvin, confirmed that if you connect your Google Merchant Feed but don’t provide any other assets, the campaign will only serve Shopping Ads. So if this is your primary focus & you don’t want to go back to Standard Shopping this could be the answer.

You can also add audience signals to hit the ground running & feed data into the algorithm – this will also be used to continuously inform the algorithms throughout the lifecycle of the campaign. 

Another important upgrade to Performance Max builds on the “New Customer Acquisition” feature of Smart Shopping where you could value new customers higher than returning. In PMax, you can now bid more for new customers or bid only for new customers. This could be a really interesting growth tool for businesses to expand their current customer base more specifically than ever before.

Performance Max also builds on the “Insights” tab of Smart Shopping, taking this further to highlight search themes that are driving conversions – this will give better insights into the trends & patterns within the market. Alongside this, it will also showcase what types of audiences are engaging with the different assets that the ads are showing. This will help you to understand how users are interacting with the ads and you can then use this information to improve & tailor your ads more effectively.

Source: Google

Performance Max continues the drawbacks of Smart Shopping too, with a lack of visibility over channel-specific performance & lack of manual optimisation; especially around the addition of negative keywords & placements. However, Google representatives have explained that this lack of data is to ensure that advertisers are allowing the algorithms to do their job properly. Giving these insights may enable human bias to pull away from certain areas within the campaign, be that channels or placements, but users should be reassured that the campaign’s sole focus is on performance. Basically, the algorithms will be taking into account any areas that aren’t delivering the required results & optimising towards the ones that do. Makes sense when you think of it like that huh?

So what do I do now?

Smart Shopping is being sunsetted in September 2022, therefore you have a bit of time to experiment & see what works for you. My guess would be to wait until the one-click migration tool is live in May. This will allow you to automatically migrate your Smart Shopping campaigns into Performance Max, meaning that there is no potential downtime of the campaigns. Doing it this way also means that Performance Max will be able to use all the historical data from the Smart Shopping campaign resulting in a much shorter learning period. This seems the safest option in both the transition & the speed of performance off the back of the migration. You can of course start testing now, however, this means that you will need to set the campaigns up from scratch which could be a lot more time consuming & leaves more room for human error.

Untitled design (73)

Forecasting PPC Growth With Help From Google Data Studio

PPC, as one of the more measurable ways of digital marketing, provides a great platform for people to understand exactly how much they are going to spend. Within reason, and by utilising data, it gives them an understanding of the type of return they can expect, as well as any growth opportunities. This makes it highly appealing to people who are looking for a directly measurable approach

As someone who studied Specialist Mathematics, I’m not afraid of some number crunching, or longer more complicated equations. However, after ploughing through endless spreadsheets I was convinced there must have been an easier way to do this – enter Google Data Studio. Now don’t get me wrong, there’s still quite a bit of maths involved here, but, the data visualisation beauty of Google Data Studio means that trying to explain it to clients just became a whole lot easier. By combining the equations & letting Google do the working out for you, you can not only leverage the data that’s available, you can also present it in a way which is pleasing to all key stakeholders.

Now I’m aware there are many different ways to do this & there are also a number of tools within the market that do this for you. So, today I will share with you how I approach PPC forecasting when it comes to growth &, also, starting to understand the type of return you can expect on both ad spend and leads when launching campaigns.

I want to caveat that there are two different ways to tackle this & today I will only be looking at growth forecasting – that is forecasting when you have pre-existing data that you can work with. If you are looking to forecast from scratch then that is a whole different ballgame (& a whole different blog)! For the purpose of today we will be focusing on utilising data that you already have to predict growth.


Forecasting – Search Growth

If you have an existing Search Campaign & you’re looking to grow your business & drive new leads, chances are that you will have undertaken some growth forecasting. This can come in a number of different formats, from Google’s own tools, Excel spreadsheets or through in-house technologies. For the example below I’m going to show you how we can do that with Google Data Studio (with the help of Google’s “Opportunity Lost” template).

You can download Google’s “Opportunity Lost” template within the Data Studio templates &, once you have it, you will see that it’s a 13 slide template enabling you to see where the opportunity is within your Google Search & Display campaigns. (Note: I haven’t yet found one for Shopping but I am in the process of looking to create one).

For the purpose of this blog we are going to be focusing on Slide 3 (Search Bid Lost Overview) & Slide 5 (Display Bid Lost Overview). Let’s start with Slide 3 (Search Bid Lost Overview).

When you first load up the presentation it will look something like this:

Now, while this dashboard in itself is incredibly useful & contains a lot of valuable information, when it came to forecasting I wanted to neaten it up to make for a more digestible board, which I could quickly & easily pull out in client presentations. Also, in the example below, as the client didn’t have an Ecommerce arm I removed all reference to Revenue, preferring to focus on the three main areas:

  • Impressions Lost
  • Impression Share Lost
  • Conversions Lost

By focusing on the above I was able to simplify the dashboard & also tailor it so that I could break it down by different dimensions, including “Day Of The Week” & “Device” to help with my optimisations.

So, after a little work I adapted the Data Studio to look like the below (please note I’ve removed the client data hence the white gaps):

The beauty of this style of diagram is that not only does it give us absolute figures (in the middle) where we can understand what that growth looks like, it also allows us to segment by a dimension to help us identify where the real growth comes from. In the example above I segmented the Impression Share column by “Day Of The Week” so I could understand on which days I needed to bid more & in the Impressions & Leads columns I segmented by “Campaign” so I could understand which Campaigns had the biggest room to grow & improve. You can also segment by Device & other dimensions to really understand where your opportunity is & to drive the growth in the most efficient manner.

To do the above you simply need to change the “Dimension” section of the Google Data Studio report to “Day of week” or “Campaign” or “Device” depending on what you are trying to analyse.

Now, in terms of the calculations from Google’s perspective these are already input into the Data Studio, but for an understanding of how we can change these to suit different dimensions I’ve listed them here:

For Impression Share – Search Lost IS (Rank)

For Impressions – Impressions / Search Impr. share * Search Lost IS (rank)

For Leads – ((Impressions / Search Impr. share * Search Lost IS (rank))* CTR) * (Conversions / Clicks)

By using the three equations above we are able to use simple metrics within the account to estimate growth capabilities based on key data such as Conversions etc… As you can see from the top sheet you then have the option to choose between specific campaigns, and drilling down on the details here will get a better analysis of the campaign.


Changing Between Impression Share, Top Impression Share & Abs. Top Impression Share

Now in some situations you may just want to know the Impression Share that is available to you & how much your clients can grow, but in others you may want to know what more is available to you. That’s where editing the equations to incorporate Top Impression Share & Abs comes in. Top Impression Share can really help.

Let’s take a look at the equation for Leads:

If we change: ((Impressions / Search Impr. share * Search Lost IS (rank)) * CTR) * (Conversions / Clicks)

To: ((Impressions / Search Impr. share * Search Lost Top IS (rank)) * CTR) * (Conversions / Clicks)

We are now forecasting the potential if each ad is in the top positions (i.e. above the Organic search rankings), as opposed to if the ad just has the opportunity to show 100% of the time. By doing this we are able to identify not only visibility growth, but also growth patterns for higher ad positions & also top ad positions using Search Abs. Top IS (rank).

By utilising the above approach you can get a good understanding of how your Search campaigns are currently performing & where the potential growth areas might be. This is a great way to plan your upcoming campaigns.

Forecasting – Display Growth

Now that we’ve looked at how to forecast Search growth, we can roll out the same principle to forecast Display growth – although generally with much bigger metrics. I’ve created a similar dashboard here for Display, which you can view below, & focused solely on any campaigns which sit on the Display Network. What’s most interesting to note here is that dimensions such as “Day of the week” & “Device” are more pronounced. This is a much easier way to digest & get that data than trying to source it manually.

The dashboard above works in exactly the same way as the Search dashboard, except that it displays content related only to the Display campaigns. The equations work in a similar manner other than they use Display Lost IS as opposed to the search variation. All in all it’s a great way to see the overall performance of the Display Campaign & identify any areas of opportunity.

Conclusion

If you’re looking for a way to effectively forecast then there are a whole host of tools out there that you can use. However, if you are looking for a quick way to utilise the power of Google Data Studio for PPC forecasting then the ideas above should help you on your journey to find out the PPC potential of your campaigns & your website!